docs-usage/04-beyond-the-api/02-previews-and-the-toolbar.md
# Previews and the Prismic Toolbar
When working in the writing room, you can preview new content on your website without having to publish the document, you can set up one or more websites where the content can be previewed. This allows you to have a production server, staging server, development server, etc. Discover how to [handle multiple environments in Prismic](https://intercom.help/prismicio/prismic-io-basics/using-multiple-environments-of-one-prismic-repository).<br/>
The Toolbar allows you to edit your pages. In your website, just click the button, select the part of the page that they want to edit, and you'll be redirected to the appropriate page in the Writing Room.
> **Preview Activation for Older Repos**
>
> The current preview toolbar is enabled by default on all new Prismic repos. However, if you're on an older repo, you might be on older version of the toolbar. If your preview script `src` URL (described in Step 2, below) includes `new=true`, then your preview functionality includes an edit button. If the `src` does not include `new=true` and you would like the new preview toolbar, please [contact us via the Prismic forum](https://community.prismic.io/t/feature-activations-graphql-integration-fields-etc/847) so we can activate it for you.
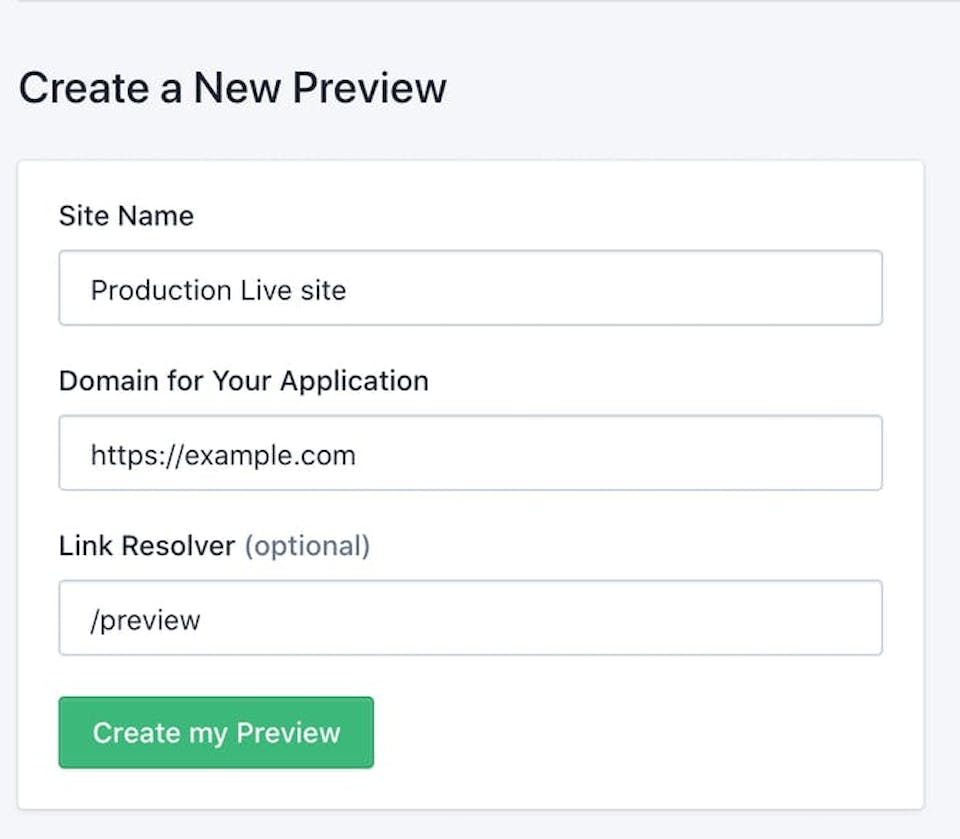
## 1. Configure Previews
In your repository, navigate to **Settings > Previews**. Here you can add the configuration for a new preview, just add:
- **The Site Name**: The name of the current site your configuring.
- **Domain URL**: You can add the URL of your live website or a localhost domain, such as: http://localhost:8000.
- **Link Resolver (optional) **: In order to be taken directly to the page you are previewing instead of the homepage, add a Link Resolver which is an endpoint on your server that takes a Prismic document and returns the url for that document. More details on step _4. Add a Link Resolver endpoint._
## 2. Include the Prismic Toolbar javascript file
You will need to include the Prismic toolbar script **on every page of your website including your 404 page.**
You can find the correct script in your repository **Settings** section, under the **Previews** tab.
**Settings > Previews > Script**
```
<script async defer src="https://static.cdn.prismic.io/prismic.js?new=true&repo=your-repo-name”></script>
```
> **Correct repo name**
>
> Note: This example script has `your-repo-name` at the end of the URL, this value needs to be replaced with your repository name. You can find the correct script for in your repository's **Settings > Previews > Script.**
> **Shearable Previews & unpublished previews**
>
> To guarantee that Shearable Preview links and unpublished document previews work properly, **you must ensure that these scripts are included on every page of your website, including your 404/Page Not Found page**. Otherwise, these previews might not work.
## 3. Use the correct reference
The next step is to make sure that the preview ref is used when you make your queries.
When you preview your website, a preview cookie is generated that contains the preview token. This token can be used as a valid ref to make Prismic API queries. For any query you make on your website, make sure to check for the Preview cookie and use this preview ref in the query options if the preview cookie exists.
The following example checks to see if there is a preview cookie. If there is, then it will set the `ref` variable to the preview ref. If not, it will use the experiment ref (if there is one) and otherwise the normal master ref (default published content).
```
def api
@api = Prismic.api('https://your-repo-name.cdn.prismic.io/api')
end
def ref
@ref ||= preview_ref || experiment_ref || api.master_ref.ref
end
def preview_ref
if request.cookies.has_key?(Prismic::PREVIEW_COOKIE)
request.cookies[Prismic::PREVIEW_COOKIE]
else
nil
end
end
def experiment_ref
if request.cookies.has_key?(Prismic::EXPERIMENTS_COOKIE)
api.experiments.ref_from_cookie(request.cookies[Prismic::EXPERIMENTS_COOKIE])
else
nil
end
end
```
Then you just need to add the `"ref"` query option as shown below to ensure that the preview ref is used. Here is an example query:
```
document = api.getByUID("page", "about-us", { "ref" => ref })
```
That is all you need to do to gain the basic functionality of the Preview feature! With the basic functionality of the Preview feature, when you click on the preview button, you will be taken to the homepage of your preview domain. From here you can navigate to the page you are trying to preview.
Next we will show you how to add a Link Resolver endpoint so that you will be taken directly to the page you are trying to preview.
## 4. Add a Link Resolver endpoint
In order to be taken directly to the page you are previewing instead of the homepage, you need to add a Link Resolver endpoint. A typical example of this would be:
```bash
http://{yoursite}/preview
```
In your preview settings add an endpoint to the optional Link Resolver field as explained in step 1.
> **Using the official Prismic starter project?**
>
> If you are using the official Prismic [Ruby on Rails starter project](https://github.com/prismicio/ruby-rails-starter), then you should already have all the code in place that you need for Previews and the Prismic Toolbar!<br/>
> If you are not using this kit to make your queries, then follow the rest of the steps below.
Now you need to add the Link Resolver endpoint in your website application. When requested this endpoint must:
- Retrieve the preview token from the `token` parameter in the query string
- Call the Prismic development kit with this token and the [Link Resolver](../04-beyond-the-api/01-link-resolving.md) will retrieve the correct URL for the document being previewed
- Redirect to the given URL
> **The Preview Token**
>
> Note that the preview token will be a URL. You DO NOT need to follow this url. All you need to do is pass this token into the `preview_session`\*\* \*\*method as shown below
Here is an example preview route:
```
# Preview
def preview
api = Prismic.api('https://your-repo-name.cdn.prismic.io/api')
preview_token = params[:token]
redirect_url = api.preview_session(preview_token, link_resolver(), '/')
cookies[Prismic::PREVIEW_COOKIE] = { value: preview_token, expires: 30.minutes.from_now }
redirect_to redirect_url
end
```
The example above uses a Link Resolver, `link_resolver()` , to determine the end url to redirect to. To learn more about how to set this up, check out our [Link Resolving](../04-beyond-the-api/01-link-resolving.md) page.
Once all of these pieces are in place, your previews should be up and running!
## 5. Troubleshooting
Mistakes happen. [Luckily we've created an article for just that](https://user-guides.prismic.io/en/articles/3403530-troubleshooting-previews).