CONTRIBUTING.md
# Contributing guidelines
## Pull Request Checklist
Before sending your pull requests, make sure you do the following:
- Read the [contributing guidelines](CONTRIBUTING.md).
- Read the [Code of Conduct](CODE_OF_CONDUCT.md).
- Ensure you have signed the
[Contributor License Agreement (CLA)](https://cla.developers.google.com/).
- Check if your changes are consistent with the
[guidelines](#general-guidelines-and-philosophy-for-contribution).
- Changes are consistent with the [Coding Style](#c-coding-style).
- Run the [unit tests](#running-unit-tests).
## How to become a contributor and submit your own code
### Typical Pull Request Workflow -
**1. New PR**
- As a contributor, you submit a New PR on GitHub.
- We inspect every incoming PR and add certain labels to the PR such as `size:`,
`comp:` etc. At this stage we check if the PR is valid and meets certain
quality requirements. For example, we check if the CLA is signed, PR has
sufficient description, if applicable unit tests are added, if it is a
reasonable contribution (meaning it is not a single liner cosmetic PR).
**2. Valid?**
- If the PR passes all the quality checks then we go ahead and assign a
reviewer.
- If the PR didn't meet the validation criteria, we request for additional
changes to be made to PR to pass quality checks and send it back or on a
rare occasion we may reject it.
**3. Review**
- For a valid PR, reviewer (person familiar with the code/functionality)
checks if the PR looks good or needs additional changes.
- If all looks good, the reviewer will approve the PR.
- If a change is needed, the contributor is requested to make the suggested
change.
- You make the change and submit it for the review again.
- This cycle repeats itself until the PR gets approved.
- Note: As a friendly reminder, we may reach out to you if the PR is awaiting
your response for more than 2 weeks.
**4. Approved**
- Once the PR is approved, it gets `kokoro:force-run` label applied and it
initiates CI/CD tests.
- We can't move forward if these tests fail.
- In such situations, we may request you to make further changes to your PR
for the tests to pass.
- Once the tests pass, we now bring all the code into the internal code base,
using a job called "copybara".
**5. Copy to Google Internal codebase and run internal CI**
- Once the PR is in the Google codebase, we make sure it integrates well with
its dependencies and the rest of the system.
- Rarely, If the tests fail at this stage, we cannot merge the code.
- If needed, we may come to you to make some changes. At times, it may not be
you, it may be us who may have hit a snag. Please be patient while we work
to fix this.
- Once the internal tests pass, we go ahead and merge the code internally as
well as externally on GitHub.
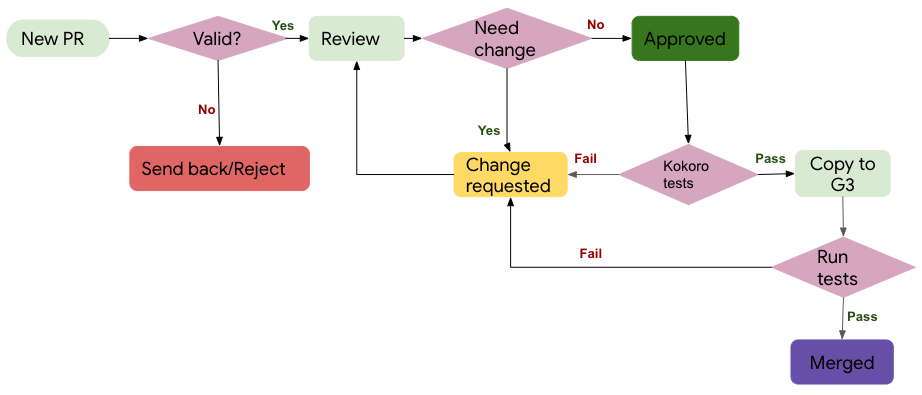
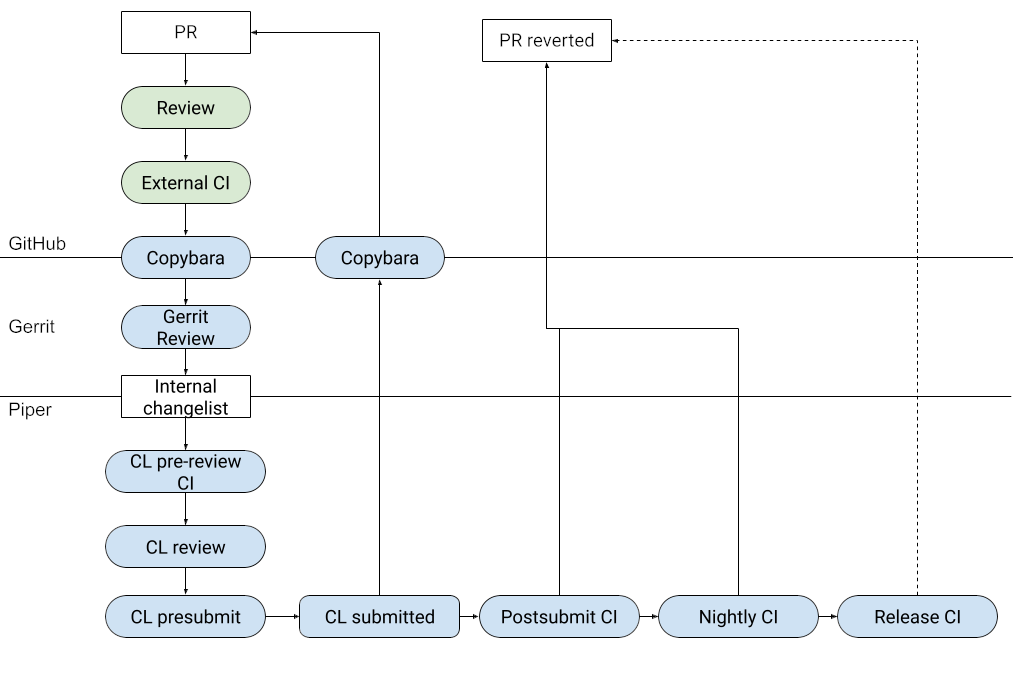
In a graphical form, the entire lifetime of a PR looks like
### Contributor License Agreements
We'd love to accept your patches! Before we can take them, we have to jump a couple of legal hurdles.
Please fill out either the individual or corporate Contributor License Agreement (CLA).
* If you are an individual writing original source code and you're sure you own the intellectual property, then you'll need to sign an [individual CLA](https://code.google.com/legal/individual-cla-v1.0.html).
* If you work for a company that wants to allow you to contribute your work, then you'll need to sign a [corporate CLA](https://code.google.com/legal/corporate-cla-v1.0.html).
Follow either of the two links above to access the appropriate CLA and instructions for how to sign and return it. Once we receive it, we'll be able to accept your pull requests.
***NOTE***: Only original source code from you and other people that have signed the CLA can be accepted into the main repository.
### Contributing code
If you have improvements to TensorFlow, send us your pull requests! For those
just getting started, GitHub has a
[how-to](https://help.github.com/articles/using-pull-requests/).
TensorFlow team members will be assigned to review your pull requests. Once the
pull requests are approved and pass continuous integration checks, a TensorFlow
team member will apply `ready to pull` label to your change. This means we are
working on getting your pull request submitted to our internal repository. After
the change has been submitted internally, your pull request will be merged
automatically on GitHub.
If you want to contribute, start working through the TensorFlow codebase,
navigate to the
[GitHub "issues" tab](https://github.com/tensorflow/tensorflow/issues) and start
looking through interesting issues. If you are not sure of where to start, then
start by trying one of the smaller/easier issues here i.e.
[issues with the "good first issue" label](https://github.com/tensorflow/tensorflow/labels/good%20first%20issue)
and then take a look at the
[issues with the "contributions welcome" label](https://github.com/tensorflow/tensorflow/labels/stat%3Acontributions%20welcome).
These are issues that we believe are particularly well suited for outside
contributions, often because we probably won't get to them right now. If you
decide to start on an issue, leave a comment so that other people know that
you're working on it. If you want to help out, but not alone, use the issue
comment thread to coordinate.
### Contribution guidelines and standards
Before sending your pull request for
[review](https://github.com/tensorflow/tensorflow/pulls),
make sure your changes are consistent with the guidelines and follow the
TensorFlow coding style.
#### General guidelines and philosophy for contribution
* Include unit tests when you contribute new features, as they help to a)
prove that your code works correctly, and b) guard against future breaking
changes to lower the maintenance cost.
* Bug fixes also generally require unit tests, because the presence of bugs
usually indicates insufficient test coverage.
* Keep API compatibility in mind when you change code in core TensorFlow,
e.g., code in
[tensorflow/core](https://github.com/tensorflow/tensorflow/tree/master/tensorflow/core)
and
[tensorflow/python](https://github.com/tensorflow/tensorflow/tree/master/tensorflow/python).
TensorFlow has passed version 1.0 and hence cannot make
non-backward-compatible API changes without a major release. Reviewers of
your pull request will comment on any API compatibility issues
[following API review practices](https://github.com/tensorflow/community/blob/master/governance/api-reviews.md).
* When you contribute a new feature to TensorFlow, the maintenance burden is
(by default) transferred to the TensorFlow team. This means that the benefit
of the contribution must be compared against the cost of maintaining the
feature.
* Full new features (e.g., a new op implementing a cutting-edge algorithm)
typically will live in
[tensorflow/addons](https://github.com/tensorflow/addons) to get some
airtime before a decision is made regarding whether they are to be migrated
to the core.
* As every PR requires several CPU/GPU hours of CI testing, we discourage
submitting PRs to fix one typo, one warning,etc. We recommend fixing the
same issue at the file level at least (e.g.: fix all typos in a file, fix
all compiler warnings in a file, etc.)
* Tests should follow the
[testing best practices](https://www.tensorflow.org/community/contribute/tests)
guide.
#### License
Include a license at the top of new files.
* [C/C++ license example](https://github.com/tensorflow/tensorflow/blob/master/tensorflow/core/framework/op.cc#L1)
* [Python license example](https://github.com/tensorflow/tensorflow/blob/master/tensorflow/python/ops/nn.py#L1)
* [Java license example](https://github.com/tensorflow/tensorflow/blob/master/tensorflow/java/src/main/java/org/tensorflow/Graph.java#L1)
* [Go license example](https://github.com/tensorflow/tensorflow/blob/master/tensorflow/go/operation.go#L1)
* [Bash license example](https://github.com/tensorflow/tensorflow/blob/master/tensorflow/tools/ci_build/ci_build.sh#L2)
* [JavaScript/TypeScript license example](https://github.com/tensorflow/tensorboard/blob/master/tensorboard/components/tf_backend/backend.ts#L1)
Bazel BUILD files also need to include a license section, e.g.,
[BUILD example](https://github.com/tensorflow/tensorflow/blob/master/tensorflow/core/BUILD#L61).
#### C++ coding style
Changes to TensorFlow C++ code should conform to
[Google C++ Style Guide](https://google.github.io/styleguide/cppguide.html).
Use `clang-tidy` to check your C/C++ changes. To install `clang-tidy` on ubuntu:16.04, do:
```bash
apt-get install -y clang-tidy
```
You can check a C/C++ file by doing:
```bash
clang-format <my_cc_file> --style=google > /tmp/my_cc_file.cc
diff <my_cc_file> /tmp/my_cc_file.cc
```
#### Python coding style
Changes to TensorFlow Python code should conform to
[Google Python Style Guide](https://github.com/google/styleguide/blob/gh-pages/pyguide.md)
Use `pylint` to check your Python changes. To install `pylint` and check a file
with `pylint` against TensorFlow's custom style definition:
```bash
pip install pylint
pylint --rcfile=tensorflow/tools/ci_build/pylintrc myfile.py
```
Note `pylint --rcfile=tensorflow/tools/ci_build/pylintrc` should run from the
top level tensorflow directory.
#### Coding style for other languages
* [Google Java Style Guide](https://google.github.io/styleguide/javaguide.html)
* [Google JavaScript Style Guide](https://google.github.io/styleguide/jsguide.html)
* [Google Shell Style Guide](https://google.github.io/styleguide/shellguide.html)
* [Google Objective-C Style Guide](https://google.github.io/styleguide/objcguide.html)
#### Running sanity check
If you have Docker installed on your system, you can perform a sanity check on
your changes by running the command:
```bash
tensorflow/tools/ci_build/ci_build.sh CPU tensorflow/tools/ci_build/ci_sanity.sh
```
This will catch most license, Python coding style and BUILD file issues that
may exist in your changes.
#### Running unit tests
There are two ways to run TensorFlow unit tests.
1. Using tools and libraries installed directly on your system.
Refer to the
[CPU-only developer Dockerfile](https://github.com/tensorflow/tensorflow/blob/master/tensorflow/tools/dockerfiles/dockerfiles/devel-cpu.Dockerfile)
and
[GPU developer Dockerfile](https://github.com/tensorflow/tensorflow/blob/master/tensorflow/tools/dockerfiles/dockerfiles/devel-gpu.Dockerfile)
for the required packages. Alternatively, use the said
[tensorflow/build Docker images](https://hub.docker.com/r/tensorflow/build)
(`tensorflow/tensorflow:devel` and `tensorflow/tensorflow:devel-gpu` are no
longer supported for) development. Use TF SIG Build Dockerfiles in
development to avoid installing the packages directly on your system (in
which case remember to change the directory from `/root` to `/tensorflow`
once you get into the running container so `bazel` can find the `tensorflow`
workspace).
you can do this by using the following command. As an example-
```bash
docker run -it --rm -v $PWD:/tmp -w /tmp tensorflow/build:2.15-python3.10
```
Once you have the packages installed, you can run a specific unit test in
bazel by doing as follows:
```bash
export flags="--config=opt -k"
```
If the tests are to be run on the GPU, add CUDA paths to LD_LIBRARY_PATH and
add the `cuda` option flag
```bash
export LD_LIBRARY_PATH="${LD_LIBRARY_PATH}:/usr/local/cuda/lib64:/usr/local/cuda/extras/CUPTI/lib64:$LD_LIBRARY_PATH"
export flags="--config=opt --config=cuda -k"
```
For example, to run all tests under tensorflow/python, do:
```bash
bazel test ${flags} //tensorflow/python/...
```
For a single component e.g. softmax op:
```bash
bazel test ${flags} tensorflow/python/kernel_tests/nn_ops:softmax_op_test
```
For a single/parameterized test e.g. `test_capture_variables` in
`tensorflow/python/saved_model/load_test.py`:
(Requires `python>=3.7`)
```bash
bazel test ${flags} //tensorflow/python/saved_model:load_test --test_filter=*LoadTest.test_capture_variables*
```
**Note:** You can add `--test_sharding_strategy=disabled` to the `flags` to
disable the sharding so that all the test outputs are in one file. However,
it may slow down the tests for not running in parallel and may cause the
test to timeout but it could be useful when you need to execute a single
test or more in general your filtered/selected tests have a very low
execution time and the sharding
[could create an overhead on the test execution](https://github.com/bazelbuild/bazel/issues/2113#issuecomment-264054799).
2. Using [Docker](https://www.docker.com) and TensorFlow's CI scripts.
```bash
# Install Docker first, then this will build and run cpu tests
tensorflow/tools/ci_build/ci_build.sh CPU bazel test //tensorflow/...
```
See
[TensorFlow Builds](https://github.com/tensorflow/tensorflow/tree/master/tensorflow/tools/ci_build)
for details.
#### Running doctest for testable docstring
There are two ways to test the code in the docstring locally:
1. If you are only changing the docstring of a class/function/method, then you
can test it by passing that file's path to
[tf_doctest.py](https://www.tensorflow.org/code/tensorflow/tools/docs/tf_doctest.py).
For example:
```bash
python tf_doctest.py --file=<file_path>
```
This will run it using your installed version of TensorFlow. To be sure
you're running the same code that you're testing:
* Use an up to date [tf-nightly](https://pypi.org/project/tf-nightly/)
`pip install -U tf-nightly`
* Rebase your pull request onto a recent pull from
[TensorFlow's](https://github.com/tensorflow/tensorflow) master branch.
2. If you are changing the code and the docstring of a class/function/method,
then you will need to
[build TensorFlow from source](https://www.tensorflow.org/install/source).
Once you are setup to build from source, you can run the tests:
```bash
bazel run //tensorflow/tools/docs:tf_doctest
```
or
```bash
bazel run //tensorflow/tools/docs:tf_doctest -- --module=ops.array_ops
```
The `--module` is relative to `tensorflow.python`.
#### Debug builds
When [building Tensorflow](https://www.tensorflow.org/install/source), passing
`--config=dbg` to Bazel will build with debugging information and without
optimizations, allowing you to use GDB or other debuggers to debug C++ code. For
example, you can build the pip package with debugging information by running:
```bash
bazel build --config=dbg //tensorflow/tools/pip_package:build_pip_package
```
TensorFlow kernels and TensorFlow's dependencies are still not built with
debugging information with `--config=dbg`, as issues occur on Linux if
there is too much debug info (see [this GitHub
issue](https://github.com/tensorflow/tensorflow/issues/48919) for context). If
you want to debug a kernel, you can compile specific files with `-g` using the
`--per_file_copt` bazel option. For example, if you want to debug the Identity
op, which are in files starting with `identity_op`, you can run
```bash
bazel build --config=dbg --per_file_copt=+tensorflow/core/kernels/identity_op.*@-g //tensorflow/tools/pip_package:build_pip_package
```
Note that the `--config=dbg` option is not officially supported.