README.md
# NanoTwitter [](https://codeclimate.com/github/FrankYan93/nanotwitter)
NanoTwitter is a ruby app with basic function of twitter. You can follow other users, tweet, like tweets and so on.
[Portfolio](https://frankyan93.github.io/nanotwitter/)
# Authors
- **[Jiadong Yan](https://frankyan93.github.io/)**
- **[Jiaming Xu](https://github.com/Dragoncell)**
- **[Xinyi Jiang](https://github.com/xyjiang94)**
# Summary Statement
This project is a web application with the basic function of twitter. A logged in user can tweet, follow and unfollow other users, like and unlike tweet. A user can see all the tweets of his/her followings in the timeline.
We provide RESTful apis, which send reponses in json. We also provide a [client library](https://github.com/xyjiang94/nT_client_library) which send and process http request to our apis.
We optimize our application to handle large scalability problems. Techniques we used including cache, multiple threads, queue, seperate service.
# Technology Description
We build this web application step by step with frequent integration of code using ***[Github](https://github.com/FrankYan93/nanotwitter), [Codeship](https://codeship.com), [Heroku](https://www.heroku.com)***.
1. Design the overall functionality and database(We use ***[PostgreSQL](https://www.postgresql.org/)***) schema.
2. Build the simple skeleton of a ***[Sinatra](http://www.sinatrarb.com/)*** application.
3. Design APIs that have the fundamental interaction with our database.
4. We use ***[ActiveRecord](https://rubygems.org/gems/sinatra-activerecord/versions/2.0.9)*** to abstract database, which is a great tool implementing ORM(object-relation mapping).
5. Build some mini-tests and create test interface.
6. Create UI with ***[erb](https://www.tutorialspoint.com/ruby/eruby.htm)*** (embedded ruby) and use ***[JQuery](https://jquery.com/)*** to control some behavior of the website elements.
7. Include some ***[CDN](https://en.wikipedia.org/wiki/Content_delivery_network)*** to beautify the website, such as ***[Bootstrap](http://getbootstrap.com/)***.
8. Using ***[Redis](https://redis.io/)***(a cache) to speed up the response by reducing direct database operations.
9. Using ***[RabbitMQ](http://www.rabbitmq.com/tutorials/tutorial-one-ruby.html)***(queue, RPC) to communicate between different servers.
# Interesting Engineering
1. We can pop up the single tweet when you click on this tweet, which is implemented by ***[JQuery](https://jquery.com/)***.
2. We have another ***[Sinatra](http://www.sinatrarb.com/)*** application running on ***[Heroku](www.heroku.com)*** that works as a web service for notification.
3. We have a special function that the app will recommend some users may interest to current user realized by shuffle. `shuffle(arr, k)` is an interesting method that input an array and a number k. Then it will return k random elements without repetition.
# Getting Started
Notification service repo: https://github.com/FrankYan93/nanoNotification
We must visit https://nano-notification.herokuapp.com/start to start our web service for notification.
Main website: https://nano-twitter-dratini.herokuapp.com
You are welcome to sign up and have fun.
## Running the tests
**How to run tests**
```
rake (run all minitests)
ruby test/testUser/testGet.rb
ruby test/testUser/testUserCreate.rb
ruby test/testUser/testFollowUnfollow.rb
ruby test/testUser/testEditProfile.rb
ruby test/testTweet/testTweetCreate.rb
```
# Screenshots
- ***Click the awesome image to see our descriptive video.[If you are curious about our voice :) ]***
[](https://www.youtube.com/watch?v=wBycBuGw380)
# Built with
- Ruby
- Sinatra
- Activerecord
- PostgreSQL
- Javascript
- JQuery
- Bootstrap
- Bootbox
- Rake
- Redis
- RabbitMQ
- Resque
- Rack
- ...
# Loader Test Results
- **0-1000 over 1 min with the root url not logged in**
1. Max # of clients active:1000
2. What time stopped:1min
3. average response time (ms):2503
4. min/max response times:15/7151
5. Error Rate:0%
6. total successes (response counts):11137
- **0 - 500 in 1 min Logged In (Test 2) - User14, Verda**
1. Max # of clients active:500
2. What time stopped:1min
3. average response time (ms):1987
4. min/max response times:12/4842
5. Error Rate:0%
6. total successes (response counts):6987
- **Logged in Random Tweets (Test 3) 0-500 clients over 1 min**
1. Max # of clients active:500
2. What time stopped:1min
3. average response time (ms):3353
4. min/max response times:17/7750
5. Error Rate:0%
6. total successes (response counts):4011
7. random send tweet:"Hello,bonnie"
- **All complete! Cheers!**
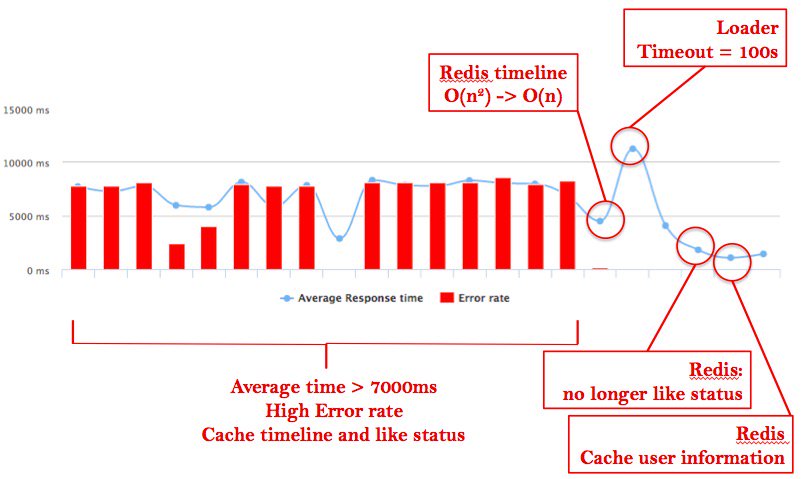
- **Result Of Scalability Work**
# Version
nT1.0
# License
This project is licensed under MIT License
# Acknowledgments
Thanks for Professor **Pito Salas**'s great guide and help from teaching assistants **Karishma Reddy Khan** and **Alex Suk**.
# Tips
1. To run the test, conduct `rake db:test:prepare` and `rake db:test:load`
Then type `rake` in the terminal to run all the test
2. Reset database: `heroku pg:reset DATABASE_URL`
3. We must flush all redis after test api used, and restart app.
run `heroku redis:cli` `flushall`
4. `heroku run rake db:migrate`
5. `lsof -i :4567` to see which process is running in port 4567
6. https://nano-notification.herokuapp.com/start will start the rabbitmq notification service
# Steps in local:
1. git clone
2. install redis in local and run redis by `redis-server` links: <http://download.redis.io/releases/redis-3.2.5.tar.gz> follow readme to install redis first
3. install RabbitMQ server by `brew update`, `brew install rabbitmq`, should first install brew first. Run rabbitmq by `rabbitmq-server` if you have some problem to start, try `sudo chown $(whoami) /usr/local/share/man/man3` and `sudo chown $(whoami) /usr/local/share/man/man5`
4. install all gems by `bundle install`
5. install [PostgreSQL](https://www.postgresql.org/) and open it
6. run `rake db:migrate`
7. run `ruby app.rb` to start the service
8. open `0.0.0.0:4567` in the web browser
9. reset data using test api
10. done!!!
# Last Modify Date
Dec 8, 2016