devops/travis.md
# Travis

Travis CI 提供的是持续集成服务(Continuous Integration,简称 CI)。它绑定 Github 上面的项目,只要有新的代码,就会自动抓取。然后,提供一个运行环境,执行测试,完成构建,还能部署到服务器。
持续集成指的是只要代码有变更,就自动运行构建和测试,反馈运行结果。确保符合预期以后,再将新代码"集成"到主干。
持续集成的好处在于,每次代码的小幅变更,就能看到运行结果,从而不断累积小的变更,而不是在开发周期结束时,一下子合并一大块代码。
## 使用准备
Travis CI 只支持 Github,不支持其他代码托管服务。这意味着,你必须满足以下条件,才能使用 Travis CI。
* 拥有 GitHub 帐号
* 该帐号下面有一个项目
* 该项目里面有可运行的代码
* 该项目还包含构建或测试脚本
首先,访问官方网站 [travis-ci.org](https://www.travis-ci.org/),点击右上角的个人头像,使用 Github 账户登入 Travis CI。
Travis 会列出 Github 上面你的所有仓库,以及你所属于的组织。此时,选择你需要 Travis 帮你构建的仓库,打开仓库旁边的开关。一旦激活了一个仓库,Travis 会监听这个仓库的所有变化。

### .travis.yml
Travis 要求项目的根目录下面,必须有一个.travis.yml文件。这是配置文件,指定了 Travis 的行为。该文件必须保存在 Github 仓库里面,一旦代码仓库有新的 Commit,Travis 就会去找这个文件,执行里面的命令。
Travis 默认提供的运行环境,请参考[官方文档](https://docs.travis-ci.com/user/languages)。目前一共支持31种语言,以后还会不断增加。
## 运行流程
Travis 的运行流程很简单,任何项目都会经过两个阶段。
* install 阶段:安装依赖
* script 阶段:运行脚本
### install
install字段用来指定安装脚本。
```yml
install: ./install-dependencies.sh
```
如果有多个脚本,可以写成下面的形式。
```yml
install:
- command1
- command2
```
上面代码中,如果command1失败了,整个构建就会停下来,不再往下进行。
如果不需要安装,即跳过安装阶段,就直接设为true。
```yml
install: true
```
### script
script字段用来指定构建或测试脚本。
```yml
script: bundle exec thor build
```
如果有多个脚本,可以写成下面的形式。
```yml
script:
- command1
- command2
```
注意,script与install不一样,如果command1失败,command2会继续执行。但是,整个构建阶段的状态是失败。
如果command2只有在command1成功后才能执行,就要写成下面这样。
```yml
script: command1 && command2
```
### 使用travis构建项目的一些例子
* [c/c++](https://docs.travis-ci.com/user/languages/c/)
* [nodejs](https://docs.travis-ci.com/user/languages/javascript-with-nodejs/)
### 部署
script阶段结束以后,还可以设置[通知步骤](https://docs.travis-ci.com/user/notifications/)和[部署步骤](https://docs.travis-ci.com/user/deployment/),它们不是必须的。
部署的脚本可以在script阶段执行,也可以使用 Travis 为几十种常见服务提供的快捷部署功能。比如,要部署到 Github Pages,可以写成下面这样。
```yml
deploy:
provider: pages
skip_cleanup: true
github_token: $GITHUB_TOKEN # Set in travis-ci.org dashboard
on:
branch: master
```
其他部署方式,请看[官方文档](https://docs.travis-ci.com/user/deployment/)。
### 钩子方法
Travis 为上面这些阶段提供了7个钩子。
* before_install:install 阶段之前执行
* before_script:script 阶段之前执行
* after_failure:script 阶段失败时执行
* after_success:script 阶段成功时执行
* before_deploy:deploy 步骤之前执行
* after_deploy:deploy 步骤之后执行
* after_script:script 阶段之后执行
完整的生命周期,从开始到结束是下面的流程。
1. before_install
2. install
3. before_script
4. script
5. aftersuccess or afterfailure
6. [OPTIONAL] before_deploy
7. [OPTIONAL] deploy
8. [OPTIONAL] after_deploy
9. after_script
### 运行状态
Travis 每次运行,可能会返回四种状态。
* passed:运行成功,所有步骤的退出码都是0
* canceled:用户取消执行
* errored:before_install、install、before_script有非零退出码,运行会立即停止
* failed :script有非零状态码 ,会继续运行
## 环境变量
.travis.yml的env字段可以定义环境变量。
```yml
env:
- DB=postgres
- SH=bash
- PACKAGE_VERSION="1.0.*"
```
然后,脚本内部就使用这些变量了。
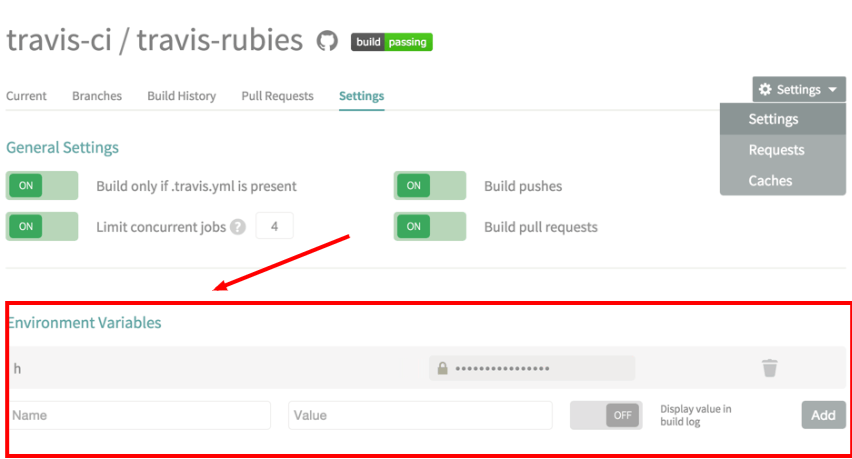
有些环境变量(比如用户名和密码)不能公开,这时可以通过 Travis 网站,写在每个仓库的设置页里面,Travis 会自动把它们加入环境变量。这样一来,脚本内部依然可以使用这些环境变量,但是只有管理员才能看到变量的值。具体操作请看[官方文档](https://docs.travis-ci.com/user/environment-variables)。

## 加密信息
如果不放心保密信息明文存在 Travis 的网站,可以使用 Travis 提供的加密功能。
首先,安装 Ruby 的包travis。
```yml
$ gem install travis
```
然后,就可以用travis encrypt命令加密信息。
在项目的根目录下,执行下面的命令。
```yml
$ travis encrypt SOMEVAR=secretvalue
```
上面命令中,SOMEVAR是要加密的变量名,secretvalue是要加密的变量值。执行以后,屏幕上会输出如下信息。
```yml
secure: ".... encrypted data ...."
```
现在,就可以把这一行加入.travis.yml。
```yml
env:
global:
- secure: ".... encrypted data ...."
```
然后,脚本里面就可以使用环境变量$SOMEVAR了,Travis 会在运行时自动对它解密。
travis encrypt命令的--add参数会把输出自动写入.travis.yml,省掉了修改env字段的步骤。
```yml
$ travis encrypt SOMEVAR=secretvalue --add
```
详细信息请看[官方文档](https://docs.travis-ci.com/user/encryption-keys/)。
## 加密文件
如果要加密的是文件(比如私钥),Travis 提供了加密文件功能。
安装命令行客户端以后,使用下面的命令登入 Travis CI。
```shell
$ travis login
```
然后,进入项目的根目录,使用travis encrypt-file命令加密那些想要加密的文件。
```shell
$ travis encrypt-file bacon.txt
encrypting bacon.txt for rkh/travis-encrypt-file-example
storing result as bacon.txt.enc
storing secure env variables for decryption
Please add the following to your build script (before_install stage in your .travis.yml, for instance):
openssl aes-256-cbc -K $encrypted_0a6446eb3ae3_key -iv $encrypted_0a6446eb3ae3_key -in bacon.txt.enc -out bacon.txt -d
Pro Tip: You can add it automatically by running with --add.
Make sure to add bacon.txt.enc to the git repository.
Make sure not to add bacon.txt to the git repository.
Commit all changes to your .travis.yml.
```
上面的代码对文件bacon.txt进行加密,加密后会生成bacon.txt.enc,该文件需要提交到代码库。此外,该命令还会生成一个环境变量$encrypted_0a6446eb3ae3_key,保存密钥,储存在 Travis CI,文件解密时需要这个环境变量。你需要把解密所需的openssl命令,写在.travis.yml的before_install字段里面。这些都写在上面的命令行提示里面。
--add参数可以自动把环境变量写入.travis.yml。
```shell
$ travis encrypt-file bacon.txt --add
encrypting bacon.txt for rkh/travis-encrypt-file-example
storing result as bacon.txt.enc
storing secure env variables for decryption
Make sure to add bacon.txt.enc to the git repository.
Make sure not to add bacon.txt to the git repository.
Commit all changes to your .travis.yml.
```